MY DIY HID headlight install
#1
 11-26-2006, 01:25 PM

Join Date: Aug 2006
Location: San Francisco Bay Area
Posts: 652
Updated July 2007
One of the things that we really missed when we bought our HCHII was the nice white light that Xenon headlights give. All of our other cars have Xenons, so we really wanted to see if we could upgrade the Civic to HID lighting.
After doing some research on the web, and reading the pros and cons that have been posted, especially about halogen vs. HID reflector design, we decided that there was not a significant body of evidence to dissuade us from upgrading the low beam headlights.
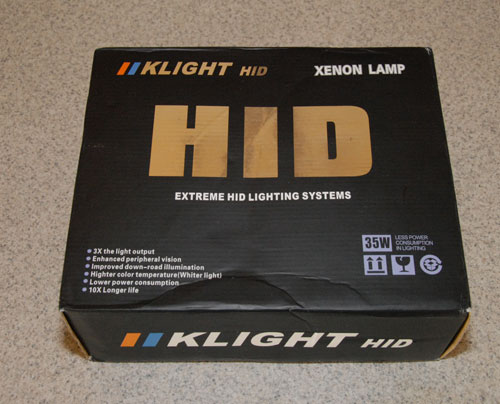
There are many aftermarket HID products available on the web, with many in the $400-600 price range. There are also several east-asia vendors out there that have similar products in the $100-$200 price range. We decided to try a Chinese vendor named Kassabian9898 Car China that has a HID kit for $156.00 including shipping. They sell their product through ebay, and have a 99.5% positive feedback rating. The product is made in the Guangdong Province of China, which is a hotbed of electronics manufacturing for export. Many US brands have their electronics manufactured in this province and some real high-quality stuff comes from this area, so I figured it was worth a try.
I placed the order Sunday afternoon, and by Wednesday afternoon the kit was delivered via UPS at my door all the way from China.
The kit came with 2 Type 9006 bulbs, the igniters and mounting brackets, headlight wiring extensions, and a direct battery/relay wiring harness for if you wished to wire the headlights directly to the battery.
The 8th Gen Civic uses Type 9006 bulbs for the low beams and Type 9005 bulbs for the high beams.
All of the materials were of very high quality, with the exception of the instruction manual. It looks like it was originally written in Chinese and then machine translated to english, and then proof read by someone that did not speak english very well. This is a minor thing, but always good for a chuckle, especially the section labeled "Produce Introduce". Lettuce entertain you....
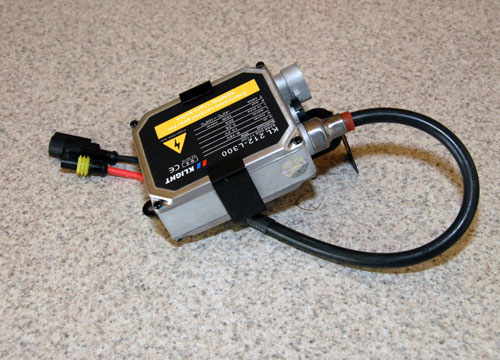
The 2 main components of the kit are the igniter/ballast and the bulb.
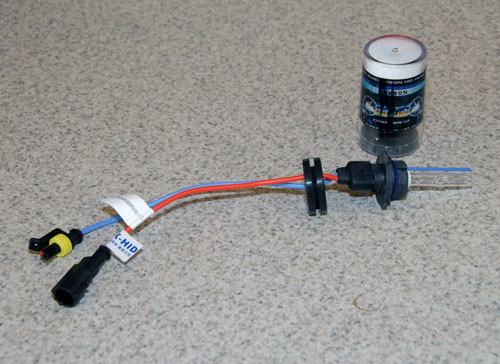
The bulb is in a standard HB-4 9006 base, so it is very easy to install.
The entire installation took about 2 hours to do at my leisure, and here is a summary of the steps involved.
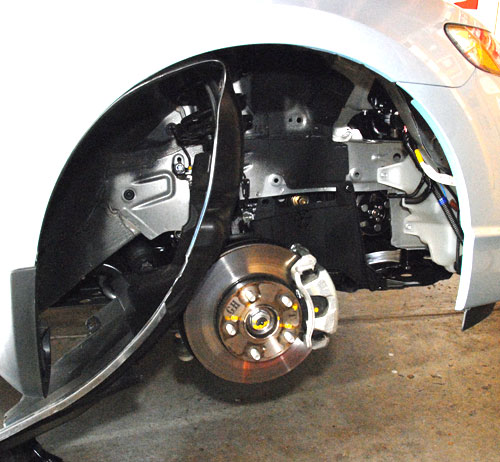
To get to the low-beam bulb on the headlight of the Civic, one has to go in through the front wheel well liner.
There are instructions in the owners manual on how to remove the liner.
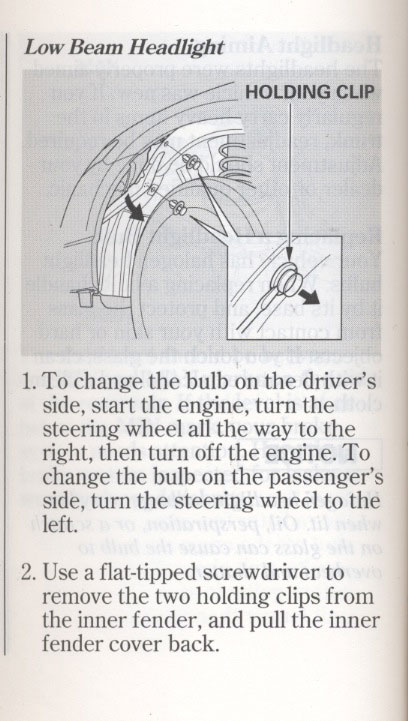
To make it easier to work, I removed the wheel, and took off about 12 fasteners to pull back the wheel liner.
Many of you have said that it is difficult to pull out the fasteners without breaking them. I found a tool that makes the removal much easier.
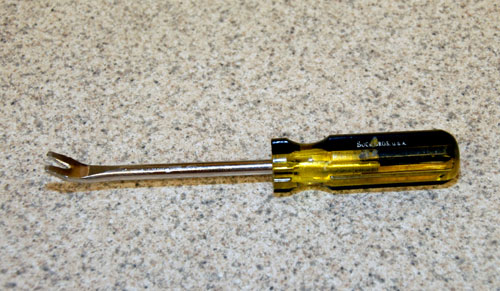
It is a tack puller, and is available at any hardware store. Simply push the tool under the head of the fastener and pop the head up.
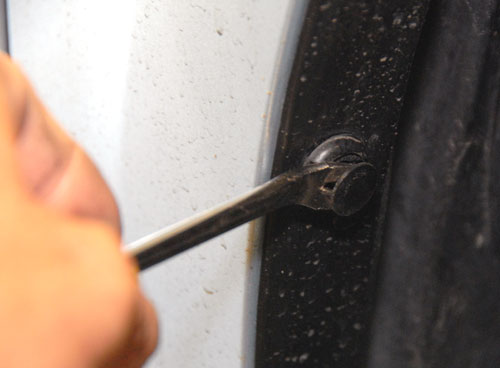
It works just great with both the large and small pop fasteners.
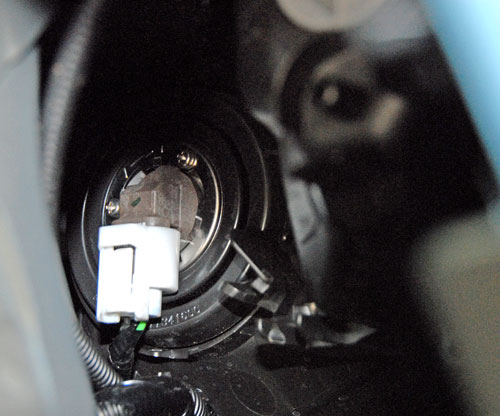
The bulb is fairly easy to get at, and twists counter-clockwise to remove. First remove the electrical connector from the bulb, and then twist out the old bulb. Installing the Xenon bulb is the opposite of removing the old bulb. Make absolutely sure that you do not touch the bulb glass with your bare fingers. The oils from your skin will shorten the life of the bulb if you get them on it. The Xenon bulb's base had a very close tolerance, so it was a little tough to get it to seat completely in the housing. I found by dabbing a little silicone lubricant on the base and O-ring that it went in much easier. Be firm when installing the new bulb, but don't force it.
After the bulb is replaced, next mount the igniter/ballast. There are not a lot of mounting places in the right wheel well, as it is pretty compact in there, but there is a bolt thread that can be used to used to mount the igniter/ballast with a 10mm nut.
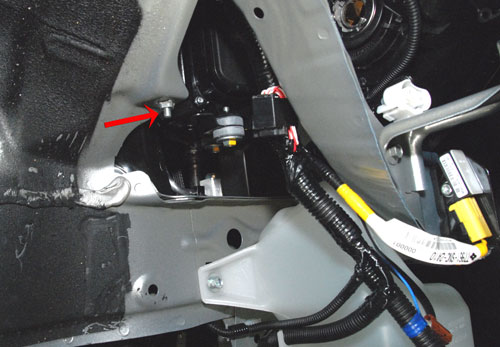
On the left wheel well, things are a little easier with a threaded nut welded to the front cross-member that allows the igniter/ballast to be mounted easily.
Once the igniter/ballast is mounted, bend the mounting bracket in the right wheelwell forward at an angle so it will clear the wheel well liner once it is reinstalled. Lastly, because the area that the ballast is mounted is very tight, and the ballast may rub on the inside of the wheel liner, I recommend placing a piece adhesive felt on the backside of the mounting bracket.
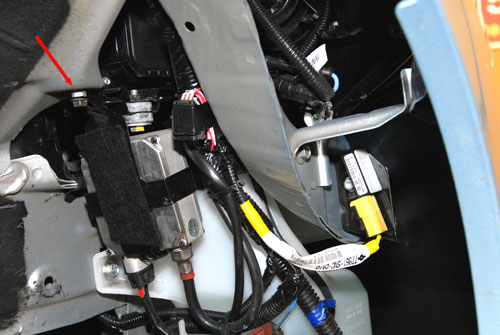
A word of caution on finding other suitable places to mount your ballasts. On the car’s front bulkhead there are 2 airbag sensors mounted outboard and about even with the place where I am recommending your mount your ballasts. These sensors are identified with Torx mounting screws and a yellow cable and connector. Do not mount your ballasts here. If you do, you may compromise the abilities of your airbags to deploy in a crash.
Here is an example of how not to install you ballasts. Complete respect to this installation and the person that did it, but there are 2 major flaws here.

First, the ballast is mounted directly to the airbag deployment crash sensor, which will compromise the ability of that sensor to work correctly in an emergency, and secondly, the ballast connector is pointed up which will allow moisture to accumulate in the connector shell.
When you see cables that have a yellow connector they are for the airbag system. Don’t mount anything on or next to components that have these cables or connectors.
When you see cables or connectors, which are bright orange, that means they have high voltage (158V +) associated with them. These are typically found in Hybrid vehicles.
When you see cables that have a orange connector they are for the hybrid electrical system. Don’t mount anything on or next to components that have these cables or connectors.
Finally make sure that you securely mount the ballast to the cars chassis by bolting it down. Don't use zip-ties to secure it. This is because you need to give the ballast a solid electrical ground for its case to minimize the EMI that radiates from the ballast.
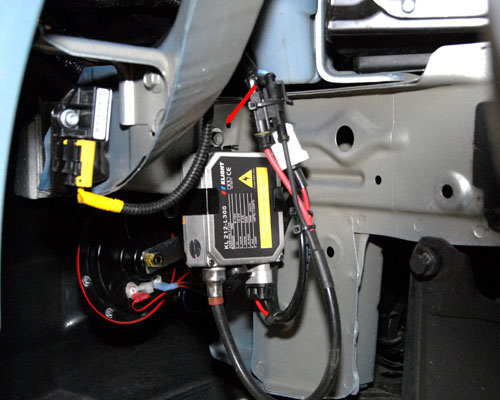
The cabling is extremely easy. Essentially, the headlight power cable from the car plugs into an extension cable that plugs into the igniter/ballast. The cable from the igniter/ballast plugs into the HID bulb cable. After that, the cables are routed along side the existing wiring harness and secured with tie-wraps, and with that, you are done. Make sure that your ballast connectors point down when you install them. This is to make sure that moisture does not accumulate in the connector.
When you plug together the connectors, it is wise to dab a little silicone lubricant in the connector shell. Sometimes the connector pins are not quite lined up and the connector will not seat. If this happens to you, gently move the pins around until they are centered in their connector shell hole. Unless the 2 connector halves "click" together, they are probably not seated fully, and your lights may not work.
Most of the HID kits come with a direct battery relay cable harness. These "Relay Harnesses" are mainly for older cars that may not have sufficient wiring to work with the HID lights.
Your Generation 8 Civic does not need the harness to use this HID kit. The factory OEM wiring is the same gauge as the Relay Harness, and also uses a switching relay to power the lamps. The factory wiring is safer than the Relay Harness because it has multiple safety fuses, one on each lamp circuit, as well as one on the main relay. They are all the proper amperage to properly support your HID upgrade.
Do not install larger fuses after installing your HID kit. Fuses are designed to open the circuit if there is a problem, and if the circuit has a larger than required fuse, damage to your wiring may occur before the fuse finally blows.
These HID kits are truly PnP. No rewiring is necessary.
HID lights are available in different color temperatures, ranging from 4300K to 30000K. The lower the temperature, the whiter and brighter the light, the higher the temperature, the more blue or purple and dimmer the light. 4300K are the color temperature of OEM bulbs. Over time as they age, their color will shift to closer to 6000K
I chose 6000K as a good compromise of brightness and color. It is a bright white blue color (similar to the color of the car!). It is quite a bit different from the Sylvania bulbs that come with the car.

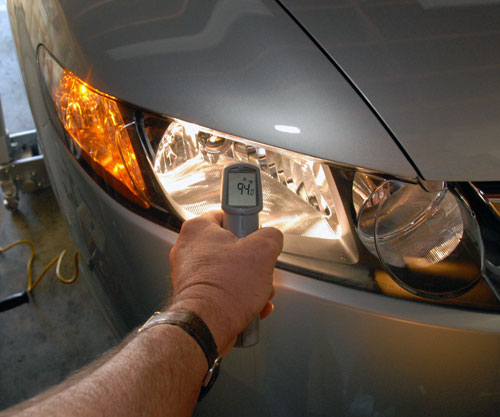
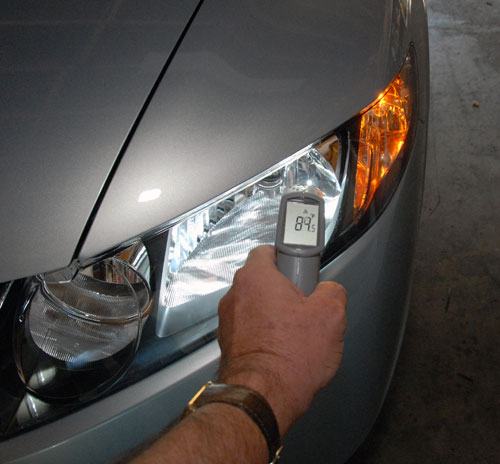
One of the concerns that I had was that the new bulbs might generate too much heat and deform the headlight housing. So I ran a test in which I let the headlights run for 1 hour, and then took their temperature with an IR thermometer. To my pleasant surprise, the headlights were actually running 5 degrees cooler with the new bulbs.
How do they perform? Very well, the Civic headlight reflector design seems to be able to handle the new bulbs with little to no glare, or other undesirable effects. I have had no one flash their lights at me, and have actually driven in front of the Civic with one of the my other cars to see how it looks from a rear-view mirror. The lights top-cutoff is very good, and the effect is no different from any other car with Xenon lights.
All-in-all, this was a well spent $150. I recommend it.
UPDATE
In the 9 months since I installed these HID lamps, they have worked flawlessly with no problems whatsoever. I have yet to have any other driver complain about excessive glare from them, and their ability to light the roadway is on a par with the Bi-Xenons in my other vehicles. In addition, it looks like the price on these kits has come down, making them even a better bargain.
While a projector retrofit will give you the best light focus and cutoff, a good projector retrofit can cost upwards of $1000. This HID retrofit is probably 90% as good as the Projector retrofit, but costs only 10% to 15% of it. After using this HID retrofit for the past 9 months, I have to say that it is a great value.
One of the things that we really missed when we bought our HCHII was the nice white light that Xenon headlights give. All of our other cars have Xenons, so we really wanted to see if we could upgrade the Civic to HID lighting.
After doing some research on the web, and reading the pros and cons that have been posted, especially about halogen vs. HID reflector design, we decided that there was not a significant body of evidence to dissuade us from upgrading the low beam headlights.
There are many aftermarket HID products available on the web, with many in the $400-600 price range. There are also several east-asia vendors out there that have similar products in the $100-$200 price range. We decided to try a Chinese vendor named Kassabian9898 Car China that has a HID kit for $156.00 including shipping. They sell their product through ebay, and have a 99.5% positive feedback rating. The product is made in the Guangdong Province of China, which is a hotbed of electronics manufacturing for export. Many US brands have their electronics manufactured in this province and some real high-quality stuff comes from this area, so I figured it was worth a try.
I placed the order Sunday afternoon, and by Wednesday afternoon the kit was delivered via UPS at my door all the way from China.
The kit came with 2 Type 9006 bulbs, the igniters and mounting brackets, headlight wiring extensions, and a direct battery/relay wiring harness for if you wished to wire the headlights directly to the battery.
The 8th Gen Civic uses Type 9006 bulbs for the low beams and Type 9005 bulbs for the high beams.
All of the materials were of very high quality, with the exception of the instruction manual. It looks like it was originally written in Chinese and then machine translated to english, and then proof read by someone that did not speak english very well. This is a minor thing, but always good for a chuckle, especially the section labeled "Produce Introduce". Lettuce entertain you....
The 2 main components of the kit are the igniter/ballast and the bulb.
The bulb is in a standard HB-4 9006 base, so it is very easy to install.
The entire installation took about 2 hours to do at my leisure, and here is a summary of the steps involved.
To get to the low-beam bulb on the headlight of the Civic, one has to go in through the front wheel well liner.
There are instructions in the owners manual on how to remove the liner.
To make it easier to work, I removed the wheel, and took off about 12 fasteners to pull back the wheel liner.
Many of you have said that it is difficult to pull out the fasteners without breaking them. I found a tool that makes the removal much easier.
It is a tack puller, and is available at any hardware store. Simply push the tool under the head of the fastener and pop the head up.
It works just great with both the large and small pop fasteners.
The bulb is fairly easy to get at, and twists counter-clockwise to remove. First remove the electrical connector from the bulb, and then twist out the old bulb. Installing the Xenon bulb is the opposite of removing the old bulb. Make absolutely sure that you do not touch the bulb glass with your bare fingers. The oils from your skin will shorten the life of the bulb if you get them on it. The Xenon bulb's base had a very close tolerance, so it was a little tough to get it to seat completely in the housing. I found by dabbing a little silicone lubricant on the base and O-ring that it went in much easier. Be firm when installing the new bulb, but don't force it.
After the bulb is replaced, next mount the igniter/ballast. There are not a lot of mounting places in the right wheel well, as it is pretty compact in there, but there is a bolt thread that can be used to used to mount the igniter/ballast with a 10mm nut.
On the left wheel well, things are a little easier with a threaded nut welded to the front cross-member that allows the igniter/ballast to be mounted easily.
Once the igniter/ballast is mounted, bend the mounting bracket in the right wheelwell forward at an angle so it will clear the wheel well liner once it is reinstalled. Lastly, because the area that the ballast is mounted is very tight, and the ballast may rub on the inside of the wheel liner, I recommend placing a piece adhesive felt on the backside of the mounting bracket.
A word of caution on finding other suitable places to mount your ballasts. On the car’s front bulkhead there are 2 airbag sensors mounted outboard and about even with the place where I am recommending your mount your ballasts. These sensors are identified with Torx mounting screws and a yellow cable and connector. Do not mount your ballasts here. If you do, you may compromise the abilities of your airbags to deploy in a crash.
Here is an example of how not to install you ballasts. Complete respect to this installation and the person that did it, but there are 2 major flaws here.
First, the ballast is mounted directly to the airbag deployment crash sensor, which will compromise the ability of that sensor to work correctly in an emergency, and secondly, the ballast connector is pointed up which will allow moisture to accumulate in the connector shell.
When you see cables that have a yellow connector they are for the airbag system. Don’t mount anything on or next to components that have these cables or connectors.
When you see cables or connectors, which are bright orange, that means they have high voltage (158V +) associated with them. These are typically found in Hybrid vehicles.
When you see cables that have a orange connector they are for the hybrid electrical system. Don’t mount anything on or next to components that have these cables or connectors.
Finally make sure that you securely mount the ballast to the cars chassis by bolting it down. Don't use zip-ties to secure it. This is because you need to give the ballast a solid electrical ground for its case to minimize the EMI that radiates from the ballast.
The cabling is extremely easy. Essentially, the headlight power cable from the car plugs into an extension cable that plugs into the igniter/ballast. The cable from the igniter/ballast plugs into the HID bulb cable. After that, the cables are routed along side the existing wiring harness and secured with tie-wraps, and with that, you are done. Make sure that your ballast connectors point down when you install them. This is to make sure that moisture does not accumulate in the connector.
When you plug together the connectors, it is wise to dab a little silicone lubricant in the connector shell. Sometimes the connector pins are not quite lined up and the connector will not seat. If this happens to you, gently move the pins around until they are centered in their connector shell hole. Unless the 2 connector halves "click" together, they are probably not seated fully, and your lights may not work.
Most of the HID kits come with a direct battery relay cable harness. These "Relay Harnesses" are mainly for older cars that may not have sufficient wiring to work with the HID lights.
Your Generation 8 Civic does not need the harness to use this HID kit. The factory OEM wiring is the same gauge as the Relay Harness, and also uses a switching relay to power the lamps. The factory wiring is safer than the Relay Harness because it has multiple safety fuses, one on each lamp circuit, as well as one on the main relay. They are all the proper amperage to properly support your HID upgrade.
Do not install larger fuses after installing your HID kit. Fuses are designed to open the circuit if there is a problem, and if the circuit has a larger than required fuse, damage to your wiring may occur before the fuse finally blows.
These HID kits are truly PnP. No rewiring is necessary.
HID lights are available in different color temperatures, ranging from 4300K to 30000K. The lower the temperature, the whiter and brighter the light, the higher the temperature, the more blue or purple and dimmer the light. 4300K are the color temperature of OEM bulbs. Over time as they age, their color will shift to closer to 6000K
I chose 6000K as a good compromise of brightness and color. It is a bright white blue color (similar to the color of the car!). It is quite a bit different from the Sylvania bulbs that come with the car.
One of the concerns that I had was that the new bulbs might generate too much heat and deform the headlight housing. So I ran a test in which I let the headlights run for 1 hour, and then took their temperature with an IR thermometer. To my pleasant surprise, the headlights were actually running 5 degrees cooler with the new bulbs.
How do they perform? Very well, the Civic headlight reflector design seems to be able to handle the new bulbs with little to no glare, or other undesirable effects. I have had no one flash their lights at me, and have actually driven in front of the Civic with one of the my other cars to see how it looks from a rear-view mirror. The lights top-cutoff is very good, and the effect is no different from any other car with Xenon lights.
All-in-all, this was a well spent $150. I recommend it.
UPDATE
In the 9 months since I installed these HID lamps, they have worked flawlessly with no problems whatsoever. I have yet to have any other driver complain about excessive glare from them, and their ability to light the roadway is on a par with the Bi-Xenons in my other vehicles. In addition, it looks like the price on these kits has come down, making them even a better bargain.
While a projector retrofit will give you the best light focus and cutoff, a good projector retrofit can cost upwards of $1000. This HID retrofit is probably 90% as good as the Projector retrofit, but costs only 10% to 15% of it. After using this HID retrofit for the past 9 months, I have to say that it is a great value.
Last edited by Orient Express; 09-04-2007 at 09:16 PM.
#3
11-26-2006, 04:50 PM
Yes Gary - great write up! Love the step-by-step method you explained (pictures too!)  .
.
I have the Sylvania SilverStars right now and they are pretty white in their light. They also have an "ultra" SS out now. I wonder how it compares to the HID.
I like the look of the bluish white on cars but also like the purple hue that you see on some also.
Did this kit also address the high beams or is that anotehr add-on?
Thanks for your time & expertise!
.I have the Sylvania SilverStars right now and they are pretty white in their light. They also have an "ultra" SS out now. I wonder how it compares to the HID.
I like the look of the bluish white on cars but also like the purple hue that you see on some also.
Did this kit also address the high beams or is that anotehr add-on?
Thanks for your time & expertise!
#4
11-26-2006, 05:20 PM

that is awesome! great write-up, and i'm thinking of doing it myself as well for only $156. How is this quality compared to the $400 kits that you have seen? also, to echo meerkat's question, does this also take care of the highbeam? or is it another kit to change that?
in addition, would it be advantageous to do this for the daytime running lights?
in addition, would it be advantageous to do this for the daytime running lights?
#5
11-26-2006, 05:26 PM
I think I remember reading somewhere that HID lights need a constant voltage to operate correctly (something to do with the ballast?). The DRL feature on the HCH cuts the feed voltage to the lights down to give produce a lower illumination for the feature.
I guess that answers my question about using these for the high beam function (duh!) .
.
I guess that answers my question about using these for the high beam function (duh!)
.
#6
11-26-2006, 05:35 PM
I think I remember reading somewhere that HID lights need a constant voltage to operate correctly (something to do with the ballast?). The DRL feature on the HCH cuts the feed voltage to the lights down to give produce a lower illumination for the feature.
I guess that answers my question about using these for the high beam function (duh!) .
I guess that answers my question about using these for the high beam function (duh!)
.
#7
11-26-2006, 05:52 PM
I think the HID requires the full operating voltage (12 vdc) in order for the ballast to fire the bulb. Like flourescent tubes in an office light fizture, they need their operating voltage from the ballast to fire off the tubes. If you starve the light bulb the power (by starving the ballast - only giving say, 8 volts) then the bulb cannot fire up.
I am told the DRLs on the HCH are operated by the system sending a lower voltage to the lights, which allows them to light up but not a full brightness. When you hit the brights (thats what those bulbs are used for) it send the full power required to light the lights at max.
Hopefully someone else out there can verify my response?
#8
11-26-2006, 06:46 PM
Join Date: Aug 2006
Location: San Francisco Bay Area
Posts: 652
There are 9005 type bulbs available in Xenon, and they give off plenty of light, but I would hate to be in front of someone with those high beams.
On as issue of the hig-beam DRLs, the other posts are correct in that the reduced voltage supply would not be enough to fire the Ignitor/ballasts, so it would not work even if you wanted ultra-high beams.
The outward quality of the kit that I installed appears to be as good as the Bosch system on my Audi. The unit comes with a lifetime warranty on the Ballast and a 3 year warranty on the bulb. I hope that I do not have to put it to the test.
Last edited by Orient Express; 11-26-2006 at 06:58 PM.
#9
11-26-2006, 06:53 PM
Join Date: Aug 2006
Location: San Francisco Bay Area
Posts: 652
I have ordered some PIAA Halogen bulbs for the car, they are only 55W bulbs but have the same light output as a 110W bulb. Most importantly they have a color temperature of 6000K, so they should have about the same color as the HIB lamps. Stay tuned for updates.


