Back up Camrea installation to the NAV unt (with pictures)
#1
 01-02-2007, 11:56 PM


Finally I bought an Eclipse BEC106 camera on eBay.
You’ll need a soldering iron, silver solder, wire snake, assorted tools and shrink tubing. You’ll also need a cables from an old computer, the ones that connect to the cd-rom’s audio.


First you need to remove the shifter console. The instructions with some greate pictures can be found this thread.
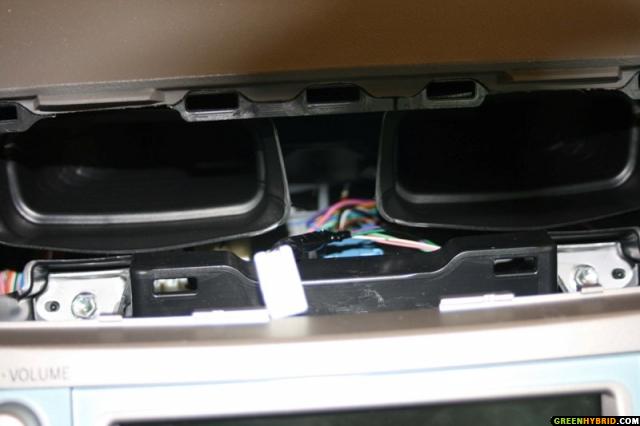
Now remove the AC vents in the middle just above the nav unit. The whole vent unit just pulls out. pay attention to the snap-in pins to be precise about where to pull.


Here is the back of the vents showing the top pins location (white connectors)

Here is the bottom pin location.

The NAV unit is attached with four bolt screws located at the top and the bottom of the unit. In order to reach the top screws you will have to remove the ac vents mentioned above. In order to access the bottom two bolts, you will also need to remove the storage compartment just behind the shifter console shown below.
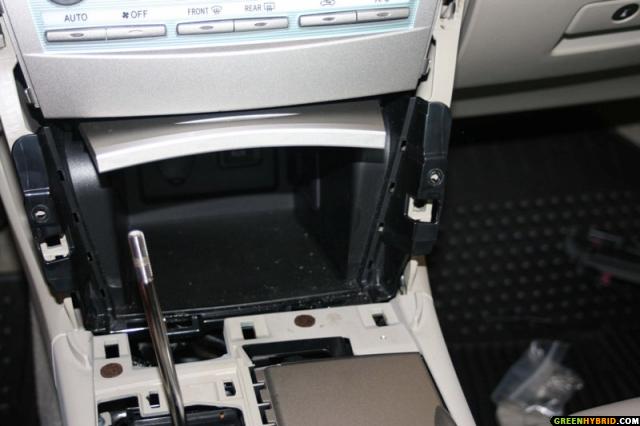
It is a good idea to move the **** lever all the way back to B gear to get better access. I forgot to do this and had to move the shifter when I got to this step. Then after removeing the two screws on each side, the storage unit will just come out.

Remove the two connectors by squeezing them out. One for the Aux plug and other for the 12V outlet.

After you get this out you can see the bottom two bolts holding the nav unit in place.

BTW, here is a picture of the top two bolts after the vent comes out.
Now, after taking these four bolts out, you are ready to pull the NAV unit out. it just slids out after a little jurk to it.
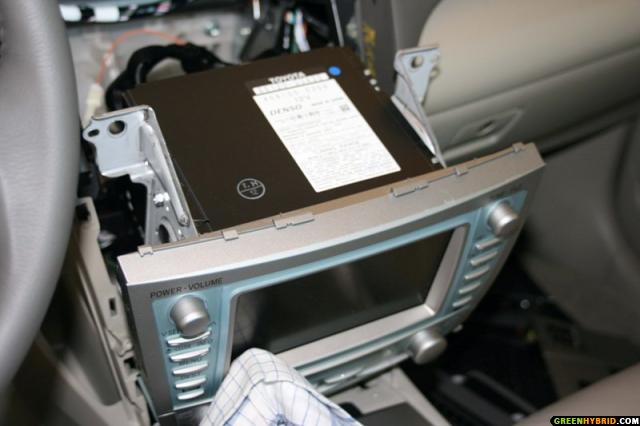
I did not completely pulled out the nav. Here is pic of what I could see.

The rest to follow in the next post (limit of images forced me to do this)
You’ll need a soldering iron, silver solder, wire snake, assorted tools and shrink tubing. You’ll also need a cables from an old computer, the ones that connect to the cd-rom’s audio.
First you need to remove the shifter console. The instructions with some greate pictures can be found this thread.
Now remove the AC vents in the middle just above the nav unit. The whole vent unit just pulls out. pay attention to the snap-in pins to be precise about where to pull.
Here is the back of the vents showing the top pins location (white connectors)
Here is the bottom pin location.
The NAV unit is attached with four bolt screws located at the top and the bottom of the unit. In order to reach the top screws you will have to remove the ac vents mentioned above. In order to access the bottom two bolts, you will also need to remove the storage compartment just behind the shifter console shown below.
It is a good idea to move the **** lever all the way back to B gear to get better access. I forgot to do this and had to move the shifter when I got to this step. Then after removeing the two screws on each side, the storage unit will just come out.
Remove the two connectors by squeezing them out. One for the Aux plug and other for the 12V outlet.
After you get this out you can see the bottom two bolts holding the nav unit in place.
BTW, here is a picture of the top two bolts after the vent comes out.
Now, after taking these four bolts out, you are ready to pull the NAV unit out. it just slids out after a little jurk to it.
I did not completely pulled out the nav. Here is pic of what I could see.
The rest to follow in the next post (limit of images forced me to do this)
#2
01-02-2007, 11:57 PM
But I verified the diagram below is correct and you are concerned with the R10 Connector.
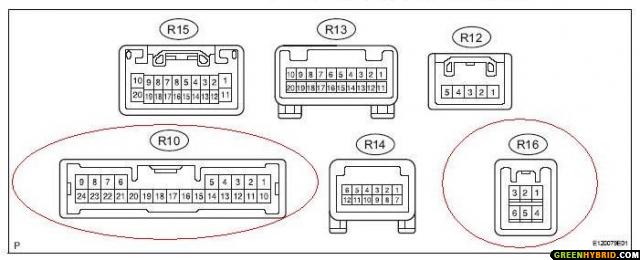
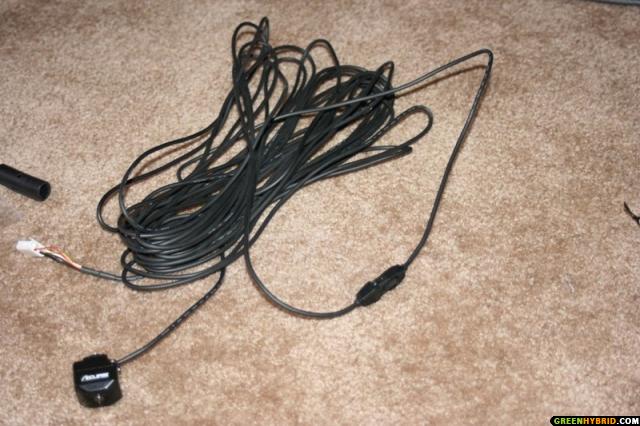
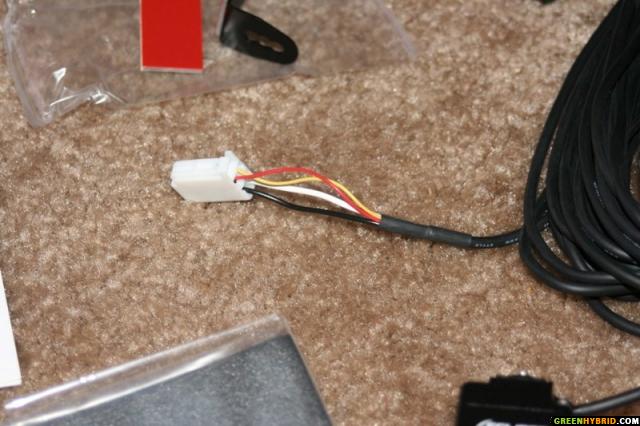
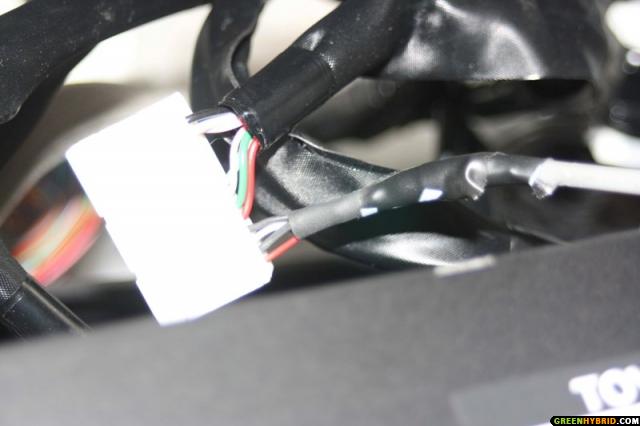
The BEC106 camera actually comes in two pieces. The camera has a length of cable attached ending in a three pin cannon plug (see picture above). A long length of cable with a cannon plug that mates to the first plug and on the other end is a four pin white connector that will connect to an Eclipse nav unit. That plug on the camera cable will have to be cut. I tried dissassemling the connector but foud that the pins are too big for the R10 plug to Toyota navigation system. You’ll also need a cables from an old computer, the ones that connect to the cd-rom’s audio.
These pins are the right size for this plug. There is only a small plastic lever that locks the pins into the connectors, so a needle can be used to pull the pins out of the connectors. In case you’re wondering, the color code on the camera is white and black are tied together for ground. The yellow is video plus and the red in for the 6 volt power. I soldered the wires with pins on, cleaned everything up with the shrink tubing and inserted the pins into the R10 connector. Just make sure you push the pins all the way into the R10 plug so it will properly mate to the nav connectors.
Pin 24 = +6V Power
Pin 23 = Video V- (Shield)
Pin 22 = Video +
Pin 21 = Ground
On the BEC106 camera I had, the red wire is +6volts - pin 24
the white and black wires are tied together at the cable plugs and you would hook them up to pins 21 and 23 of R10. Doesn't really matter which goes to where, but I put the black wire to 21 and the white to 23.
the yellow wire is video+ and I put that into pin 22 of the R10 plug.

Here is the final R10 looks like after making the connections.
After inserting the R10 connector back into the nav unit I did a quick test of the camera and voilla, I could see the inside of the car (the camera was sitting in the back seat) with the shifter into the Reverse.

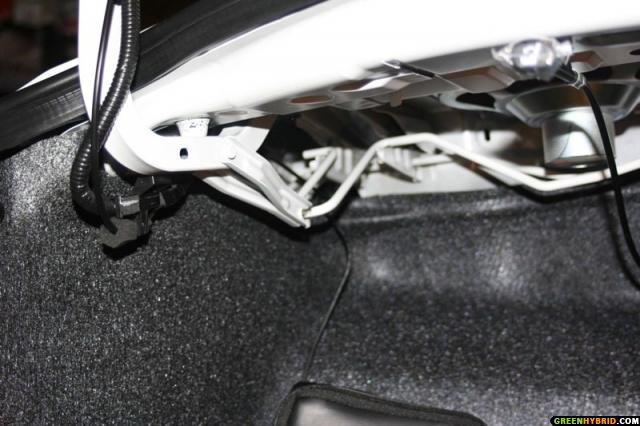
Now it was a matter of putting everything back and running the wire to the back in the trunk. I pulled the wire from behind the nav to the bottom of hte driver side and from under the carpet to the side by the driver side door sill. Pulle both the front and the back door sills and used the fish tap to run the wire to the back of the back door, from there up the back of the back seat. Now fished from inside the trunk There is a circular opening on the upper part of the drivers side in the trunk that has wiring going through it. I used that opening to fish the snake through. It comes out by the space between the back seat and the door. Now all the wire was in the trunk.
Here is a picture of the opening in the trunk (upper part of the trunk).
I ran the wire alog the rest of the wires into the trunk lid. Yo will have to remvoe the trunk lid lining by pulling those push pins.

The rest of the wire has to be fed through the outside of the lid. I took off the trunk part that has the Toyota logo and the license plate lights. It’s held on by five bolts and a couple of snap connectors. I did not need to take the whole thing off. Just loosen it enough on the driver side to ran the wire through threre. I ran the camera cable through the drivers side license plate light opening.


There is a grommet that has the trunk release sensor wire running through. I used this to string the camera cable through, no holes to drill.

Now I'm inside the trunk, connected the two ends of the camera wires. Tested it one last time before re-assembling closing the lid lining. Now mounted the camera with already one double sided tape to the supplied bracket.

Here is a close up the camera
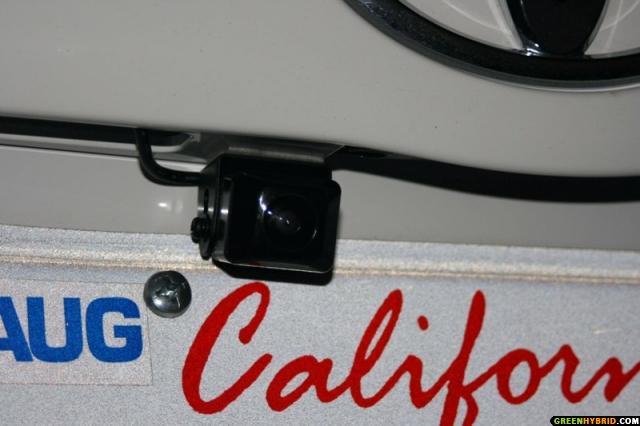
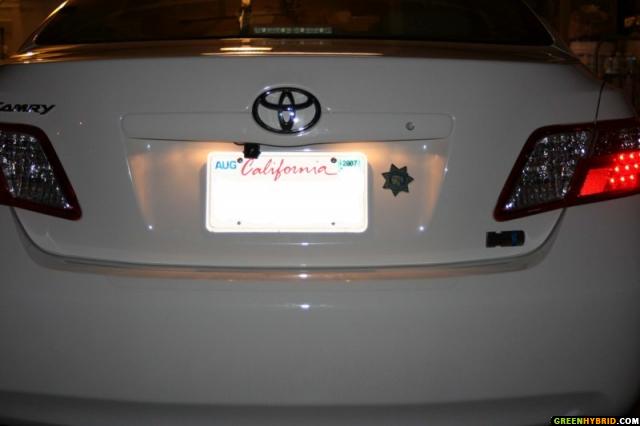
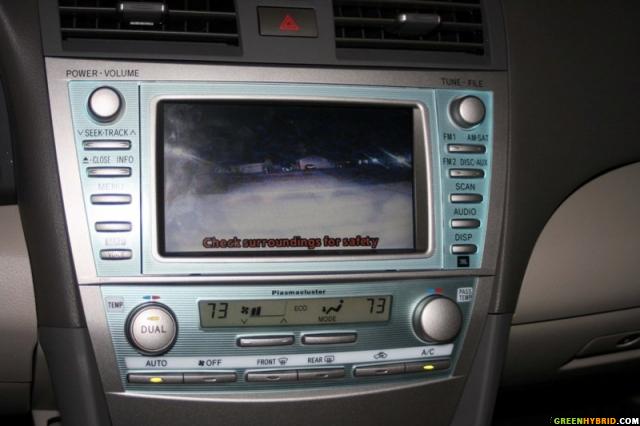
Here are the final result pictures both ouside and inside.
Some smoke from the tale pile and some fog is showing in the camera
The whole install took me about 4 to 5 hours (lack of experience) but saved alot. Total cost $170.00 ( for the camera, delived from ebay)
I hope it explained well, may be few too many pictures but if you are any body like me, more pictures, the better. Please feel free to ask any questions that you might have.
The BEC106 camera actually comes in two pieces. The camera has a length of cable attached ending in a three pin cannon plug (see picture above). A long length of cable with a cannon plug that mates to the first plug and on the other end is a four pin white connector that will connect to an Eclipse nav unit. That plug on the camera cable will have to be cut. I tried dissassemling the connector but foud that the pins are too big for the R10 plug to Toyota navigation system. You’ll also need a cables from an old computer, the ones that connect to the cd-rom’s audio.
These pins are the right size for this plug. There is only a small plastic lever that locks the pins into the connectors, so a needle can be used to pull the pins out of the connectors. In case you’re wondering, the color code on the camera is white and black are tied together for ground. The yellow is video plus and the red in for the 6 volt power. I soldered the wires with pins on, cleaned everything up with the shrink tubing and inserted the pins into the R10 connector. Just make sure you push the pins all the way into the R10 plug so it will properly mate to the nav connectors.
Pin 24 = +6V Power
Pin 23 = Video V- (Shield)
Pin 22 = Video +
Pin 21 = Ground
On the BEC106 camera I had, the red wire is +6volts - pin 24
the white and black wires are tied together at the cable plugs and you would hook them up to pins 21 and 23 of R10. Doesn't really matter which goes to where, but I put the black wire to 21 and the white to 23.
the yellow wire is video+ and I put that into pin 22 of the R10 plug.
Here is the final R10 looks like after making the connections.
After inserting the R10 connector back into the nav unit I did a quick test of the camera and voilla, I could see the inside of the car (the camera was sitting in the back seat) with the shifter into the Reverse.
Now it was a matter of putting everything back and running the wire to the back in the trunk. I pulled the wire from behind the nav to the bottom of hte driver side and from under the carpet to the side by the driver side door sill. Pulle both the front and the back door sills and used the fish tap to run the wire to the back of the back door, from there up the back of the back seat. Now fished from inside the trunk There is a circular opening on the upper part of the drivers side in the trunk that has wiring going through it. I used that opening to fish the snake through. It comes out by the space between the back seat and the door. Now all the wire was in the trunk.
Here is a picture of the opening in the trunk (upper part of the trunk).
I ran the wire alog the rest of the wires into the trunk lid. Yo will have to remvoe the trunk lid lining by pulling those push pins.
The rest of the wire has to be fed through the outside of the lid. I took off the trunk part that has the Toyota logo and the license plate lights. It’s held on by five bolts and a couple of snap connectors. I did not need to take the whole thing off. Just loosen it enough on the driver side to ran the wire through threre. I ran the camera cable through the drivers side license plate light opening.
There is a grommet that has the trunk release sensor wire running through. I used this to string the camera cable through, no holes to drill.
Now I'm inside the trunk, connected the two ends of the camera wires. Tested it one last time before re-assembling closing the lid lining. Now mounted the camera with already one double sided tape to the supplied bracket.
Here is a close up the camera
Here are the final result pictures both ouside and inside.
Some smoke from the tale pile and some fog is showing in the camera
The whole install took me about 4 to 5 hours (lack of experience) but saved alot. Total cost $170.00 ( for the camera, delived from ebay)
I hope it explained well, may be few too many pictures but if you are any body like me, more pictures, the better. Please feel free to ask any questions that you might have.
#3
01-03-2007, 01:17 PM

That's an excellent job - can I pay you to do an install for me?
Is there any interference with the navigation system or components? Does this do anything to your warranty or extended warranty (if you purchased one)?
How well can you see at night?
Is there any interference with the navigation system or components? Does this do anything to your warranty or extended warranty (if you purchased one)?
How well can you see at night?
#4
01-03-2007, 02:54 PM
There is no interference from any other components (navigation/radio/bluetooth etc.).
As the camera uses the +6V that is standard output from the R10 connector pin 24, I don't think it would impact on warranty as there is no modification as such. All I did was, to use the existing pins meant specificaly for this purpose. The camera comes on automaticaly when you put the car in reverse.
It works amazingly well at night as the backup light is enought for this ultra low light wide angle camera. You can see farther and better then if you turn around and see with your eyes. Only problem is the very bright sunlight. It is a little on the 'too shinny to see clearly' side in bright sunlights.
#5
01-03-2007, 04:50 PM
Pretty cool and thank you for going through all of that and creating this thread!
I have to ask - is something inverted / reversed or do you have a right hand drive car?
I have to ask - is something inverted / reversed or do you have a right hand drive car?
#6
01-03-2007, 09:22 PM
 The camera is sitting upside down. It inverts the picture left side right (or right side left) when positioned upside down. This is one thing you have to be carefull before mounting the backup camera.

#8
01-04-2007, 11:44 PM
What's the difference between the BEC106 and the BEC105 you installed?
#9
01-05-2007, 04:30 AM
I looked but was able to find nothing. I can see no difference between the 105 I have and the 106 depicted in the DIY.


