DIY: High Intensity Discharge (HID) headlight installation
#1
 10-08-2008, 06:20 PM

Join Date: Jan 2007
Location: Mid Hudson Valley, New York
Posts: 1,389
Disclaimer: Neither the author of this guide, the site that hosts this guide, or any site referenced by this guide is responsible for damage done to your vehicle or injury to yourself if you attempt to follow this guide. Use this guide at your own risk.
DIY: High Intensity Discharge (HID) headlight installation
Abstract
This thread documents a do-it yourself (DIY) guide for the installation of high intensity discharge (HID) headlights on a 2007 Toyota Camry Hybrid using a HID kit. This guide should apply to all current generation (6) Toyota Camry Hybrids and possibly all other models (such as CE, LE, and XLE).
Tip: Images in this guide will load at a reduced size (thumbnail). Click the thumbnail for a direct link to a full-size image.
Overview of converting to HID headlights
There are various ways to convert a vehicle with halogen headlights to HID headlights. The most common method is to use what is called a "HID kit." HID kits are sold by a number of on-line retailers and at various price points. HID kits are also sold by many detailing and after market automotive parts dealers and installation establishments.
An alternative method for HID headlight installation is to perform a retrofit. This method results in the most accurate installation and an installation that does not pose a glare annoyance to oncoming vehicles. Retrofitting is usually more expensive and time consuming.
There are also various color temperatures of HID bulbs. HID bulbs typically range from 3000K to 12000K. The lower the color rating, more yellow the emitted light. The higher the color rating, more blue or purple the emitted light. The most visible light output is at around 4300K. For more information on HID bulb color temperature, see the following (courtesy of Mobile HID):


(Click on an image for more details.)
The advantages of HID headlights are:
If you are unfamiliar with the term "high intensity discharge" in relation to automotive headlights, the following is suggested reading:
Time required for installation
The amount of time required for installation of a HID kit depends on your level of expertise and whether or not you use a wiring harness or are able to use a wiring adapter keeping the stock wiring.
The following times are estimates for planning purposes only:
Tips for a successful installation
Required tools and supplies
The following tools are required to use this guide.
Notes:
What's in the box
When you purchase a HID kit you will usually receive the following items:
Steps for discovering what's in the box
Perform the following steps to discover what's in the box.
You have now discovered what's in the box.
Steps to prepare for installation
Perform the following steps to prepare for installation.
You have now prepared for installation.
Steps for removing the left and right splash guards (engine undercover)
Tools required for this step:
Parts required for this step:
Perform the following steps to remove the left and right splash guard.
You have now finished removing the left and right splash guards.
Continue with (Part 2) DIY: High Intensity Discharge (HID) headlight installation.
DIY: High Intensity Discharge (HID) headlight installation
Abstract
This thread documents a do-it yourself (DIY) guide for the installation of high intensity discharge (HID) headlights on a 2007 Toyota Camry Hybrid using a HID kit. This guide should apply to all current generation (6) Toyota Camry Hybrids and possibly all other models (such as CE, LE, and XLE).
Tip: Images in this guide will load at a reduced size (thumbnail). Click the thumbnail for a direct link to a full-size image.
Overview of converting to HID headlights
There are various ways to convert a vehicle with halogen headlights to HID headlights. The most common method is to use what is called a "HID kit." HID kits are sold by a number of on-line retailers and at various price points. HID kits are also sold by many detailing and after market automotive parts dealers and installation establishments.
An alternative method for HID headlight installation is to perform a retrofit. This method results in the most accurate installation and an installation that does not pose a glare annoyance to oncoming vehicles. Retrofitting is usually more expensive and time consuming.
There are also various color temperatures of HID bulbs. HID bulbs typically range from 3000K to 12000K. The lower the color rating, more yellow the emitted light. The higher the color rating, more blue or purple the emitted light. The most visible light output is at around 4300K. For more information on HID bulb color temperature, see the following (courtesy of Mobile HID):
(Click on an image for more details.)
The advantages of HID headlights are:
- More visible light (lumens)
- Lower operating power (wattage)
- Longer life span (hours)
If you are unfamiliar with the term "high intensity discharge" in relation to automotive headlights, the following is suggested reading:
- [Wikipedia] High-intensity discharge lamp
- [Wikipedia] Headlamp: HID (xenon) light sources
Time required for installation
The amount of time required for installation of a HID kit depends on your level of expertise and whether or not you use a wiring harness or are able to use a wiring adapter keeping the stock wiring.
The following times are estimates for planning purposes only:
Beginner: 5 hours
Intermediate: 3 hours
Experienced: 1.5 hours
Intermediate: 3 hours
Experienced: 1.5 hours
Tips for a successful installation
- Read all installation instructions.
- When using a wiring harness, make sure you locate the fuse and relay in a location that will not allow them to get wet. If the fuse or relay get wet, the functionality of your system will be compromised.
- Be very mindful of keeping the parts of your kit dry and out of direct contact with water.
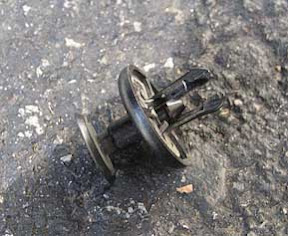
- Use caution when removing the left and right splash guard (engine undercover) support pins under the vehicle. The middle of the pin pops out allowing you to remove the entire pin. If you force the removal, the pin teeth will break. These pins are about $2 (USD) each.
- Take your time.
- Do not be afraid to innovate and be creative. The method described in this guide is just one of the many ways to install and HID kit.
Required tools and supplies
The following tools are required to use this guide.
- HID kit - H11 plugs (see note 4)
- Ramps or jack stands
- Philips head screwdriver
- Socket wrench (ratchet)
- 10mm and 12mm socket
- Needle nose pliers
- Drill (see note 2)
- 3/8" or 1/2" drill bit (see note 2)
- 3/4" galvanized pipe strap, about 6 inches - two 3 inch pieces (see note 1)
- Felt or pipe insulating tape (see note 3)
- Electrical tape
- Zip ties
- Time
- Patience
Notes:
- The galvanized pipe strap was used because it was on hand from a previous plumbing project. The pipe strap was also used because it provided a stiff mounting support and the ability to mount using existing bolts (the ballasts used mounting hardware that was too small to mount to an existing location). Other mounting methods could be used (such as velcro, zip ties, and so on).
- The use of a drill depends on the type of galvanized pipe strap you use. Due to the size of the bolts used for mounting, a hole in the pipe strap must be enlarged.
- The felt or pipe insulating tape was used to pad the back of the ballast to reduce possible damage to the ballast during installation and from the pipe strap.
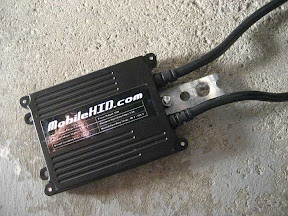
- This guide uses the Mobile HID 5000K digital ballast HID kit. If you purchased a different kit, you should be able to follow the same basic instructions.
- When using a digital ballast you have the option to power the ballast directly from the stock wiring. When using the Mobile HID digital ballast kit, you will require Mobile HID to supply you with a modified harness to connect the stock H11 plug to the ballast plug.
- For safety reasons, this guide will instruct you to power the HID headlights by way of their own power source and use the stock wiring to trip a relay as opposed to powering the HID headlights directly. This does not require any additional harness parts when using the Mobile HID kit.
What's in the box
When you purchase a HID kit you will usually receive the following items:
- Two ballasts (digital or non-digital)
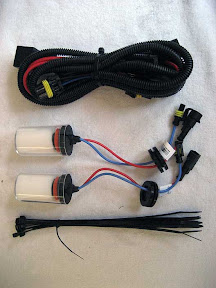
- Two HID bulbs
- Wiring harness
- Zip ties
- Basic mounting hardware
- Installation instructions
Steps for discovering what's in the box
Perform the following steps to discover what's in the box.
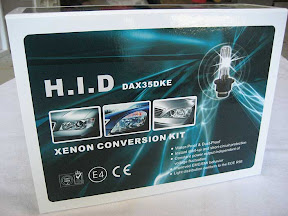
- Locate the box.
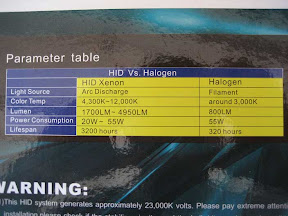
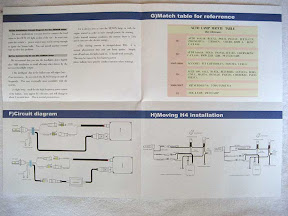
- Read the parameter table outlining the difference between HID bulbs and halogen bulbs. Notice that HID bulbs emit more light (lumens), have a lower operating power (wattage), and last longer (hours).
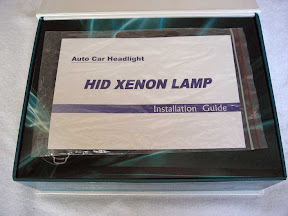
- Open the box. The first thing you see are the installation instructions.
- Remove the installation instructions and parts cover to reveal the various parts of the kit.
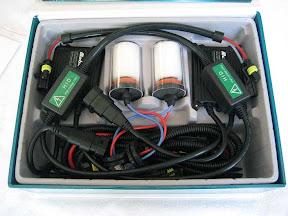
- Remove the digital ballasts.
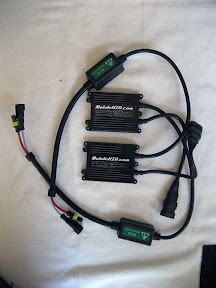
- Remove the wiring harness, HID bulbs, and zip ties.
You have now discovered what's in the box.
Steps to prepare for installation
Perform the following steps to prepare for installation.
- Gather the required tools and supplies.
- Read page 1 of the installation instructions and locate the basic mounting hardware.
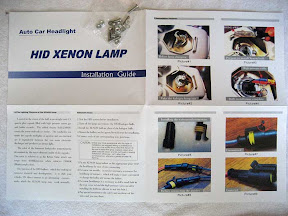
- Read page 2 of the installation instructions.
You have now prepared for installation.
Steps for removing the left and right splash guards (engine undercover)
Tools required for this step:
- Ramps or jack stands
- Philips head screwdriver or socket wrench (ratchet)
- 10mm socket
Parts required for this step:
- None
Perform the following steps to remove the left and right splash guard.
- (Optional) Drive the vehicle onto ramps or place the front of the vehicle on jack stands. Doing this will make access to the underside of the vehicle much easier.
- (Optional) Engage the parking brake or chalk the back wheels. Safety first.
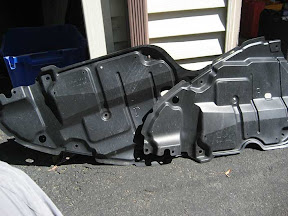
- Remove the left (driver side) splash guard.
In the image below, the left splash guard is the one at the top.
Remove the five screws and all push pins (two or three). There are four screws along the outer edge and one in the middle holding the left and right splash guard together.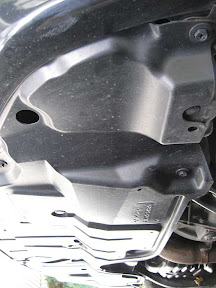
IMPORTANT: Remember the tip concerning the push pins. Pull out the middle first. Then remove then entire pin.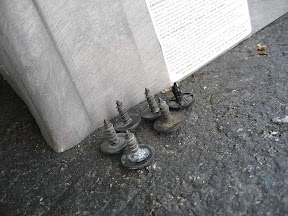
The left splash guard should now drop out.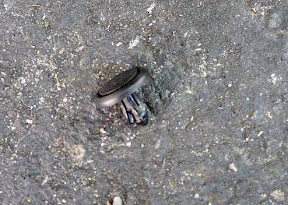
- Remove the right (passenger side) splash guard.
In the image below, the right splash guard is the one at the bottom.
Remove the three screws and all push pins (three or four). The screws are along the outer edge.
IMPORTANT: Remember the tip concerning the push pins. Pull out the middle first. Then remove then entire pin.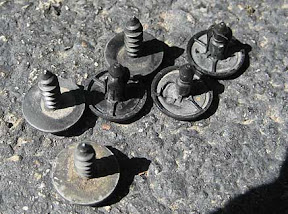
The right splash guard should now drop out.
You have now finished removing the left and right splash guards.
Continue with (Part 2) DIY: High Intensity Discharge (HID) headlight installation.
Last edited by mikieboyblue; 12-17-2008 at 05:40 PM.
#2
10-09-2008, 08:11 PM
Join Date: Jan 2007
Location: Mid Hudson Valley, New York
Posts: 1,389
Disclaimer: Neither the author of this guide, the site that hosts this guide, or any site referenced by this guide is responsible for damage done to your vehicle or injury to yourself if you attempt to follow this guide. Use this guide at your own risk.
Steps to locate the mounting point and mount the driver side ballast
Tools required for this step:
Parts required for this step:
Before you begin: You should know that the method used to mount your ballast might differ from the method used in this step. Your method will depend on what type of mounting hardware is supplied with the ballast.
Perform the following steps to locate the mounting point and mount the driver side ballast.
You have now finished mounting the driver side ballast.
Steps to locate the mounting point and mount the passenger side ballast
Tools required for this step:
Parts required for this step:
Before you begin: You should know that the method used to mount your ballast might differ from the method used in this step. Your method will depend on what type of mounting hardware is supplied with the ballast.
Perform the following steps to locate the mounting point and mount the passenger side ballast.
You have now finished mounting the passenger side ballast.
Continue with (Part 3) DIY: High Intensity Discharge (HID) headlight installation.
Steps to locate the mounting point and mount the driver side ballast
Tools required for this step:
- Socket wrench (ratchet)
- 12mm socket
- Philips head screwdriver
- Drill
- 3/8" or 1/2" drill bit
- 3/4" galvanized pipe strap
- Felt or pipe insulating tape
Parts required for this step:
- Ballast
- Ballast mounting hardware
Before you begin: You should know that the method used to mount your ballast might differ from the method used in this step. Your method will depend on what type of mounting hardware is supplied with the ballast.
Perform the following steps to locate the mounting point and mount the driver side ballast.
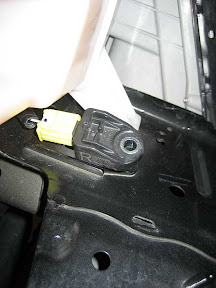
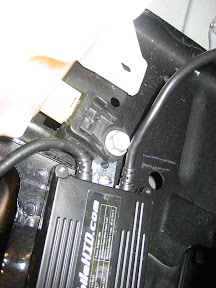
- Lie under the front driver side of the vehicle.
- Locate the yellow ground connector bolted to the outward facing side of the frame.
Remove the stock bolt using the socket wrench and 12mm socket.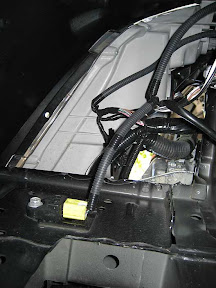
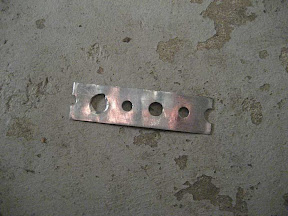
- Break off a piece of the galvanized pipe strap about three to four inches long and drill out the last hole.
Note: The hole size alternates.
Break a piece off by bending the strap, alternating sides, and splitting a hole in half. The piece should start with a split large hole followed by a small hole - large hole - small hole and then another split large hole. The key it make sure the piece is long enough.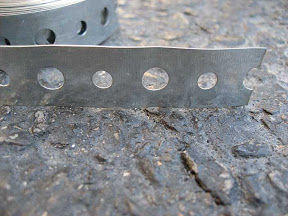
Use the drill to drill out the last small hole so that the stock bolt removed in the previous step will screw though the hole.
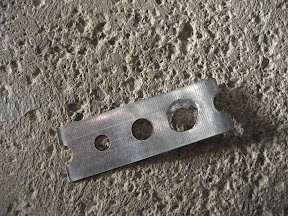
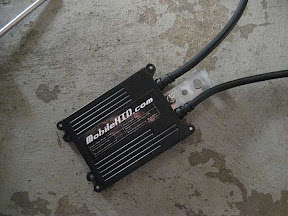
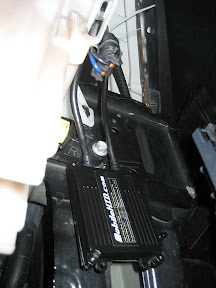
- Apply felt or pipe insulating tape to the back of the ballast. The felt or tape will protect the back from the ballast from bring marred by the galvanized pipe strap.
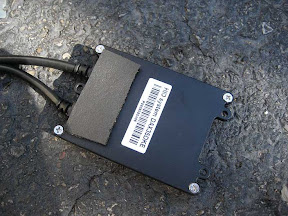
- Attach the piece of galvanized pipe strap to the ballast using the supplied mounting hardware.
Tip: Put the supplied mounting screw through the hole in the ballast from the back so the ballast will mount flush.
- Mount the ballast using the stock bolt. Place the galvanized mounting strap behind the stock bold and connector.
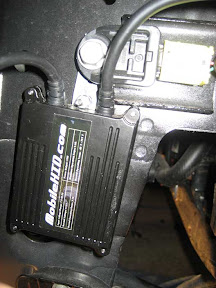
You have now finished mounting the driver side ballast.
Steps to locate the mounting point and mount the passenger side ballast
Tools required for this step:
- Socket wrench (ratchet)
- 12mm socket
- Philips head screwdriver
- Drill
- 3/8" or 1/2" drill bit
- 3/4" galvanized pipe strap
- Felt or pipe insulating tape
Parts required for this step:
- Ballast
- Ballast mounting hardware
Before you begin: You should know that the method used to mount your ballast might differ from the method used in this step. Your method will depend on what type of mounting hardware is supplied with the ballast.
Perform the following steps to locate the mounting point and mount the passenger side ballast.
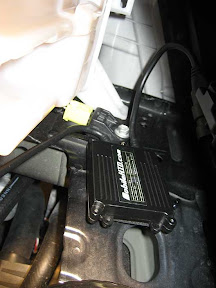
- Lie under the front passenger side of the vehicle.
- Locate the yellow ground connector bolted to the outward facing side of the frame. It is located below the windshield washer fluid reservoir.
Remove the stock bolt using the socket wrench and 12mm socket.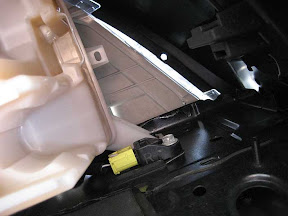
- Break off a piece of the galvanized pipe strap about three to four inches long and drill out the last hole. This piece must be longer than the piece used for the driver side ballast.
Note: The hole size alternates.
Break a piece off by bending the strap, alternating sides, and splitting a hole in half. The piece should start with a split large hole followed by a small hole - large hole - small hole - large hole and then a split small hole. The key it make sure the piece is long enough.
Use the drill to drill out the last large hole so that the stock bolt removed in the previous step will screw though the hole.
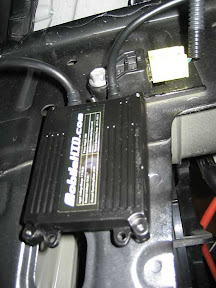
- Apply felt or pipe insulating tape to the back of the ballast. The felt or tape will protect the back from the ballast from bring marred by the galvanized pipe strap.
- Attach the piece of galvanized pipe strap to the ballast using the supplied mounting hardware.
Tip: Put the supplied mounting screw through the hole in the ballast from the back so the ballast will mount flush.
- Mount the ballast using the stock bolt. Place the galvanized mounting strap behind the stock bold and connector.
You have now finished mounting the passenger side ballast.
Continue with (Part 3) DIY: High Intensity Discharge (HID) headlight installation.
Last edited by mikieboyblue; 10-21-2008 at 07:30 AM.
#3
10-09-2008, 08:12 PM
Join Date: Jan 2007
Location: Mid Hudson Valley, New York
Posts: 1,389
Disclaimer: Neither the author of this guide, the site that hosts this guide, or any site referenced by this guide is responsible for damage done to your vehicle or injury to yourself if you attempt to follow this guide. Use this guide at your own risk.
Steps to remove driver side stock halogen bulb and install the new HID bulb
Tools required for this step:
Parts required for this step:
Perform the following steps to remove the driver side stock halogen bulb and install the new HID bulb.
You have now finished removing the driver side stock halogen bulb and installing the new HID bulb.
Steps to remove passenger side stock halogen bulb and install the new HID bulb
Tools required for this step:
Parts required for this step:
Perform the following steps to remove the passenger side stock halogen bulb and install the new HID bulb.
You have now finished removing the passenger side stock halogen bulb and installing the new HID bulb.
Continue with (Part 4) DIY: High Intensity Discharge (HID) headlight installation.
Steps to remove driver side stock halogen bulb and install the new HID bulb
Tools required for this step:
- None
Parts required for this step:
- HID bulb
Perform the following steps to remove the driver side stock halogen bulb and install the new HID bulb.
- Locate and remove the driver side halogen bulb.
Disconnect the driver side bulb from the stock wiring.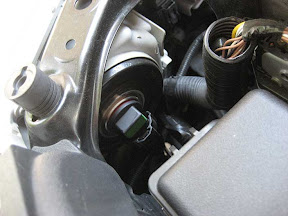
Twist the driver side bulb toward the outside of the vehicle and remove it.
- Insert one of the HID bulbs into the driver side headlight housing.
Tip: Align the tabs on the new bulb with the slots on the headlight housing.
Twist the driver side HID bulb toward the center of the vehicle to secure it.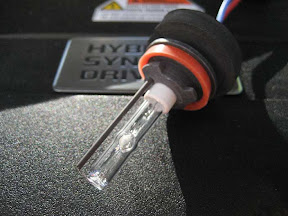
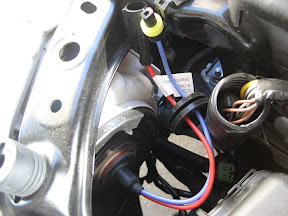
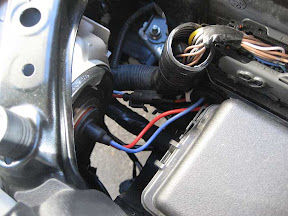
- Locate the red and blue wires attached to the driver side ballast.
- Connect the red wire from the bulb to the red wire from the ballast.
- Connect the blue wire from the bulb to the blue wire from the ballast.
You have now finished removing the driver side stock halogen bulb and installing the new HID bulb.
Steps to remove passenger side stock halogen bulb and install the new HID bulb
Tools required for this step:
- None
Parts required for this step:
- HID bulb
Perform the following steps to remove the passenger side stock halogen bulb and install the new HID bulb.
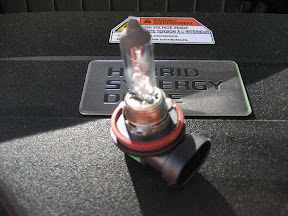
- Locate and remove the passenger side halogen bulb.
Disconnect the passenger side bulb from the stock wiring.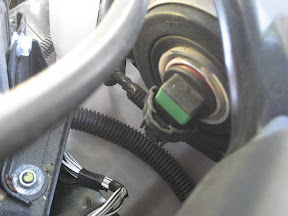
Twist the passenger side bulb toward the center of the vehicle and remove it.
- Insert one of the HID bulbs into the passenger side headlight housing.
Tip: Align the tabs on the new bulb with the slots on the headlight housing.
Twist the passenger side HID bulb toward the outside of the vehicle to secure it.
- Locate the red and blue wires attached to the driver side ballast.
- Connect the red wire from the bulb to the red wire from the ballast.
- Connect the blue wire from the bulb to the blue wire from the ballast.
You have now finished removing the passenger side stock halogen bulb and installing the new HID bulb.
Continue with (Part 4) DIY: High Intensity Discharge (HID) headlight installation.
Last edited by mikieboyblue; 10-21-2008 at 07:31 AM.
#4
10-09-2008, 08:13 PM
Join Date: Jan 2007
Location: Mid Hudson Valley, New York
Posts: 1,389
Disclaimer: Neither the author of this guide, the site that hosts this guide, or any site referenced by this guide is responsible for damage done to your vehicle or injury to yourself if you attempt to follow this guide. Use this guide at your own risk.
Steps for connecting the positive (red) wire of the wiring harness to a power source
Tools required for this step:
Parts required for this step:
Attention: The use of a wiring harness is recommended for safety reasons. Alternatively, when using digital ballasts, you may connect the ballasts directly to the stock wiring.
Note: If using the Mobile HID kit, you must request an adapter from Mobile HID to connect the stock wiring to the ballast. If you choose to use the stock wiring by way of an adapter, skip this section. Otherwise, continue with this section.
Perform the following steps to connect the positive (red) lead of the wiring harness to a power source.
You have now finished connecting the positive wire of the wiring harness to a power source.
Steps for connecting the negative (black) wire of the wiring harness to a grounding point
Tools required for this step:
Parts required for this step:
Note: If using the stock wiring by way of an adapter, skip this section. Otherwise, continue with this section.
Perform the following steps to connect the negative (black) wire of the wiring harness to a grounding point.
You have now finished connecting the negative wire of the wiring harness to a grounding point.
Steps to route the wiring harness extension to the passenger side ballast
Tools required for this step:
Parts required for this step:
Note: If using the stock wiring by way of an adapter, skip to the next to last step in the section and connect the ballast using the wiring adapter.
Perform the following steps to route the wiring harness extension to the passenger side ballast.
You have now finished routing the wiring harness extension to the passenger side ballast.
Steps for connecting the wiring harness relay to the driver side stock wire
Tools required for this step:
Parts required for this step:
Note: If using the stock wiring by way of an adapter, skip this section. Otherwise, continue with this section.
Perform the following steps to connect the wiring harness relay to the driver side stock wire.
You have now finished connecting the wiring harness relay to a power source.
Steps for connecting the driver side ballast to the wiring harness
Tools required for this step:
Parts required for this step:
Note: If using the stock wiring by way of an adapter, skip to the next to last step in the section and connect the ballast using the wiring adapter.
Perform the following steps to connect the driver side ballast to the wiring harness.
You have now finished connecting the wiring harness to the driver side ballast.
Steps for completing the HID headlight installation
Tools required for this step:
Parts required for this step:
Perform the following steps to complete the HID headlight installation.
You have now completed the installation of HID headlights.
Steps for connecting the positive (red) wire of the wiring harness to a power source
Tools required for this step:
- Socket wrench (ratchet)
- 10mm socket
- Needle nosed pliers
Parts required for this step:
- Wiring harness
Attention: The use of a wiring harness is recommended for safety reasons. Alternatively, when using digital ballasts, you may connect the ballasts directly to the stock wiring.
Note: If using the Mobile HID kit, you must request an adapter from Mobile HID to connect the stock wiring to the ballast. If you choose to use the stock wiring by way of an adapter, skip this section. Otherwise, continue with this section.
Perform the following steps to connect the positive (red) lead of the wiring harness to a power source.
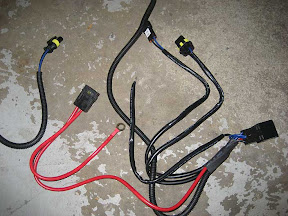
- Locate the supplied wiring harness.
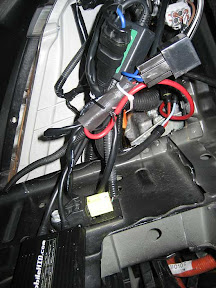
- Locate the engine compartment fuse box and remove the cover.
Tip: The engine compartment fuse box is located on the driver side.
- Locate the remote terminal post in the center-left of the fuse box.
DANGER: The remote terminal post is always hot (live). Use extreme caution to avoid electrocuting yourself.
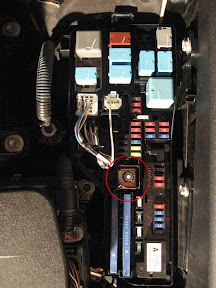
- Remove the nut using the socket wrench and 10mm socket.
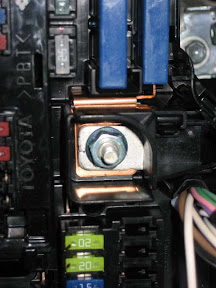
- Route the positive (red) wire from the wiring harness to the fuse box, through the slot in the housing of the fuse box, and place the ring over the post.
Tip: Use needle nose pliers to help pull the wire through the wiring support near the slot.
- Replace the nut and tighten it.
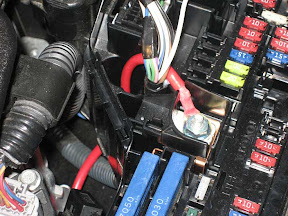
- Route the remaining wire in an out-of-sight location and replace the cover of the fuse box.
You have now finished connecting the positive wire of the wiring harness to a power source.
Steps for connecting the negative (black) wire of the wiring harness to a grounding point
Tools required for this step:
- Socket wrench (ratchet)
- 10mm socket
Parts required for this step:
- Wiring harness
Note: If using the stock wiring by way of an adapter, skip this section. Otherwise, continue with this section.
Perform the following steps to connect the negative (black) wire of the wiring harness to a grounding point.
- Lie under the front driver side of the vehicle.
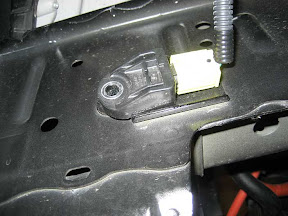
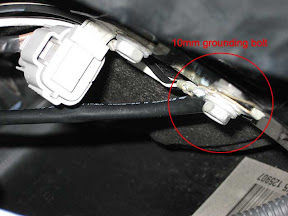
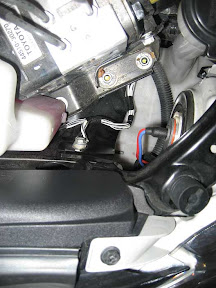
- Locate the grounding bolt directly in front of the wheel well.
Tip: There are two grounding bolts. Use the bolt which does not have the large light gray connector attached.
- Remove the bolt using the socket wrench and 10mm socket.
- Place the ring of the negative (black) wire over the bolt.
- Replace the bolt and tighten it. Make sure the stock wires, which were mounted there, are still properly mounted.
Tip: The stock wires have a small tab which should be inserted into a slot above the grounding bolt.
You have now finished connecting the negative wire of the wiring harness to a grounding point.
Steps to route the wiring harness extension to the passenger side ballast
Tools required for this step:
- Electrical tape
- Zip ties
Parts required for this step:
- Ballast
- Wiring harness
Note: If using the stock wiring by way of an adapter, skip to the next to last step in the section and connect the ballast using the wiring adapter.
Perform the following steps to route the wiring harness extension to the passenger side ballast.
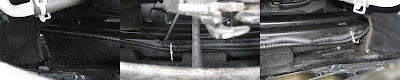
- Lie under the front driver side of the vehicle.
- Feed the long, wire loom protect, wiring harness extension through a slot in the frame along the bumper support rail under the driver side headlight housing.
Tip: There is a stock wire which runs along this support rail to the horns and hood latch. Follow the same path.
Continue to run the wiring harness extension along the bumper support rail.
- Feed the wiring harness extension through a slot in the frame between the bumper support rail and passenger side headlight housing.
Pull the slack through to the passenger side.
- Stand above the front of the vehicle.
- Reaching down from the top, use zip ties to secure the wiring harness extension to the stock wire.
Tip: Use black zip ties to limit visibility.
- Connect the wiring harness extension connector to the passenger side ballast.
Tip: Electrical tape the wiring harness extension connector and ballast connector together to ensure they do not accidentally come apart.
- Tidy up the passenger side wiring using zip ties for a clean install.
You have now finished routing the wiring harness extension to the passenger side ballast.
Steps for connecting the wiring harness relay to the driver side stock wire
Tools required for this step:
- Electrical tape
Parts required for this step:
- Wiring harness
Note: If using the stock wiring by way of an adapter, skip this section. Otherwise, continue with this section.
Perform the following steps to connect the wiring harness relay to the driver side stock wire.
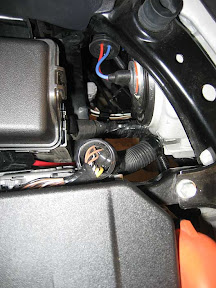
- Lie under the front driver side of the vehicle.
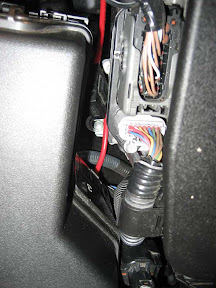
- Locate the driver side stock wiring connector.
- Locate the wiring harness wire with a female H11 connector.
- Connect the stock wiring connector to the wiring harness connector.
Tip: Electrical tape the wiring harness female H11 connector and stock wiring connector together to ensure they do not accidentally come apart.
Note: You connect the wiring harness relay to the stock connector so that the HID bulbs will turn on when your headlights would normally turn on.
You have now finished connecting the wiring harness relay to a power source.
Steps for connecting the driver side ballast to the wiring harness
Tools required for this step:
- Electrical tape
- Zip ties
Parts required for this step:
- Ballast
- Wiring harness
Note: If using the stock wiring by way of an adapter, skip to the next to last step in the section and connect the ballast using the wiring adapter.
Perform the following steps to connect the driver side ballast to the wiring harness.
- Lie under the front driver side of the vehicle.
- Locate the wiring harness connector and connect it to the ballast connector.
Tip: Electrical tape the wiring harness connector and ballast connector together to ensure they do not accidentally come apart.
- Tidy up the driver side wiring using zip ties for a clean install.
You have now finished connecting the wiring harness to the driver side ballast.
Steps for completing the HID headlight installation
Tools required for this step:
- Philips head screwdriver or socket wrench (ratchet)
- 10mm socket
Parts required for this step:
- None
Perform the following steps to complete the HID headlight installation.
- Double check wiring and all connections.
- Start the vehicle.
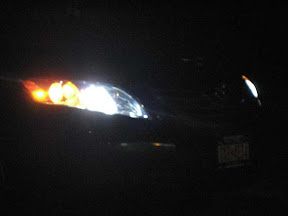
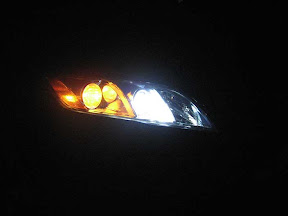
- Turn on the headlights. The HID bulbs should ignite and turn on.
If your HID headlights did not turn on or there was a problem with one of the bulbs, triple check all wiring. If you are unable to resolve the problem, contact the HID kit vendor or manufacturer.
Note: HID bulbs generally have a short warm up time (one second or so). Do not be alarmed if they are not instantly bright.
- Install the right and left splash guards (engine undercovers).
Install the right splash guard (engine undercover) using the three screws and all push pins.
Install the left splash guard (engine undercover) using the five screws and all push pins.
Requirement: You must install the splash guards in the order indicated.
- Tidy up the visible wires coming from the driver side bulb to the ballast.
- Tidy up the visible wires coming from the passenger side bulb to the ballast.
- Wait until dark and take them out for a test.

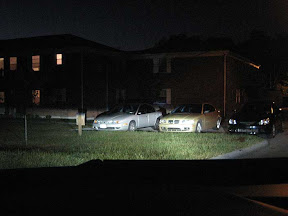
You have now completed the installation of HID headlights.
Last edited by mikieboyblue; 10-21-2008 at 07:31 AM.
#5
10-09-2008, 08:27 PM
Join Date: Jan 2007
Location: Mid Hudson Valley, New York
Posts: 1,389
Hello everyone,
I recently completed the do-it-your guide to HID headlight installation.
I did my best to write it up in a way that would work for the least to most experienced individuals. I also relied on my memory and if I made any mistakes, please let me know. Specifically, I am not 100% sure of the socket sizes and was not 100% sure about the number of push pins (some of mine were missing).
Finally, it took me much longer to write this up than it did to do the actual installation. Using the wiring harness adds about 30 minutes to the total time - give or take. If you use the stock wiring adapter, this guide will take you longer to read than to do the actual install.
Good luck.
I hope this is of help to someone!
Mike
Last edited by mikieboyblue; 10-20-2008 at 09:47 PM.
#6
10-16-2008, 05:30 AM

This is awesome. This guide is of such high quality that I am now considering an HID upgrade for my TCH. I'll definitely be checking back often for updates.
Thank you so much for doing this!
Thank you so much for doing this!
#8
10-16-2008, 09:20 AM
Join Date: Jan 2007
Location: Mid Hudson Valley, New York
Posts: 1,389
Thanks Andrew and Ed. I will hopefully have it done soon. There is not much left to write.
#9
10-20-2008, 10:12 PM
Join Date: Jan 2007
Location: Mid Hudson Valley, New York
Posts: 1,389
Hello everyone,
I recently completed the do-it-your guide to HID headlight installation.
I did my best to write it up in a way that would work for the least to most experienced individuals. I also relied on my memory and if I made any mistakes, please let me know. Specifically, I am not 100% sure of the socket sizes and was not 100% sure about the number of push pins (some of mine were missing).
Finally, it took me much longer to write this up than it did to do the actual installation. Using the wiring harness adds about 30 minutes to the total time - give or take. If you use the stock wiring adapter, this guide will take you longer to read than to do the actual install.
Good luck.
I hope this is of help to someone!
Mike
I recently completed the do-it-your guide to HID headlight installation.
I did my best to write it up in a way that would work for the least to most experienced individuals. I also relied on my memory and if I made any mistakes, please let me know. Specifically, I am not 100% sure of the socket sizes and was not 100% sure about the number of push pins (some of mine were missing).
Finally, it took me much longer to write this up than it did to do the actual installation. Using the wiring harness adds about 30 minutes to the total time - give or take. If you use the stock wiring adapter, this guide will take you longer to read than to do the actual install.
Good luck.
I hope this is of help to someone!
Mike


