Master List of LEDs Bulb Sizes & DIY/Tutorials for Interior/Exterior Lights
#1
 05-23-2009, 11:47 AM


** FOR RESPECT TO OTHERS, PLEASE KEEP THIS ON TOPIC. THIS KEEPS IT LESS CLUTTERED!!! **
*WARNING* - I nor ToyotaNation or any of the members who provided DIY/Tutorials are responsible for any damages caused to your vehicle when following the information provided. Depending on the price and quality of LEDs, changing to LEDs can be pricey but your vehicle will consume less battery and will never have to worry about replacing (unless the LED was defective/faulty to begin with). It can cost you anywhere between $50-$200 (guess-timate. It all depends on how many you're changing and quality/brightness you're looking for). If you're going to change out your lights to LED, please be sure you know what will be needed. CE/LE/SE/XLE and Hybrid may vary in LEDs. Its best to order them all at once as it gets a bit pricey if you order a few here and a few there...shipping costs will add up. Changing bulbs requires removal of parts/pieces/panels to gain access to the bulbs/LEDs. Majority are fairly easy to gain access to with the use of a screwdriver, flat head and socket wrench that even a noob can do. It gets more complex if you're looking to change out green/orange SMD LEDs for a different color.
__________________________________________________
So here is a MASTER list of LED/bulb sizes & DIY/Tutorials needed for those DIYers who want to change the interior or exterior to LEDs. Everything you need to know can be found here..or most of it at least. With the help of members and yourself, the information gathered is from your/their own experience. Majority of the bulbs in Gen 6/6.5 Camry's and Gen 5/5.5's probably use the same bulbs unless noted (PLEASE go to Sylvania's website to see exactly what bulb size your car uses). This is also a place for everyone to post info/tutorials/DIY on how to access areas that has not already been posted or for those who need help (that is not available. SEE below for DIY links before asking). Again, please keep this on topic. **Any posts that is NOT on topic will be deleted.
Site to see what bulbs are used in your car - http://www.sylvania.com/ConsumerProd...lacementGuide/
Site on how to remove panels and parts - http://www.camrystuff.com/ (PDF downloads. Requires Adobe Reader)
There are sites to buy LED bulbs or SMD/SMT from:
- http://www.autolumination.com - interior/exterior LED bulbs
- http://www.superbrightleds.com - interior/exterior LED bulbs
- http://www.v-leds.com - 15% Coupon Code [TOYOTANATION] - interior/exterior LED bulbs
- http://www.oznium.com - cathodes, PLCC-2, pre-wired LEDs
- http://www.ledmod.com - purchase 1206, PLCC-2 SMD/SMT or 5mm leds
- http://www.ebay.com (I suggest only using eBay if you're looking to buy small 1206, PLCC-2 SMD/SMT LEDs or 3mm, 5mm LEDs)
- http://www.khoalty.com - interior/exterior LED bulbs
MISC:
Gen 5 - 2002-2004
Gen 5.5 - 2005-2006
Gen 6 - 2007-2009
Gen 6.5 - 2010-present
LED Conversion (3157 to 3156 / 7443 to 7440) - http://www.autolumination.com/conversion.html
LED Turn Signal video - http://www.youtube.com/watch?v=nhETq2VbuX0
Complete LED conversion - http://www.youtube.com/watch?v=pk7wmi5VI-g
DIY Requests: (These are requests that is not listed below. If you have done any of these, please post up a DIY on how you accomplished this. It would greatly help the community)
- LED in cubby hole (with or without switch)
- LED in cup holder (with or without switch)
- LED in storage compartment of armrest (with or without switch)
- LED in heated seats buttons
DIY Links: (listed in alphabetical order)
- To change the parking light, turn signal and/or front side reflector bulb, you will need to reach into your wheel well to gain access. You will not be able to reach the bulbs from the engine bay. Take a flathead screwdriver and pop out two clips (1 in front and 1 on top). Pull back bumper and wheel well cover and stick your hand in.
- "Airbag" and "Fasten Seatbelt" indicator on dash (Gen 6)
- Alternative List of LEDs (Gen 6/6.5)
- Cathode Trunk Light (soldering required)
- DIY LED Door Handles new.gif
- DIY Load Resistor Installation
- Door, Trunk, License and Dome (no sunroof) / +Shifter (Gen 6/6.5)
- Footwell LED Accent Light w/headlights (Gen 6)
- Footwell to Instrument Cluster (Gen 5/5.5)
- Footwell to Dome Light (Gen 5/5.5)
- Footwell to Dome Light (Gen 6/6.5)
- Glove Box / Glove Box #2 (Gen 6/6.5)
- HVAC Control / HVAC Control (Gen 5/5.5)
- HVAC Control / Image of HVAC Control (Gen 6)
- Instrument Cluster / Instrument Cluster (Gen 6)
- Installing LED Taillights / Tail Light Removal (requires loosening of bumper) available on eBay (Gen 6)
- Interior Lights (Map, Dome, Shifter, Courtesy Doors, Trunk, and License Plates) (Videos - Gen 6/6.5) - Now includes Reverse Lights new.gif
- License Plate
- Load Resistor Installation Instructions (PDF)
- Radio / Image of Radio (Gen 6)
- Rear Reading Lights (Gen 6/6.5)
- Remove Instrument Panel/Cluster (install electronic LED flasher module - Gen 6/6.5)
- Shifter, Map Light/Dome and Glove box (Gen 6/6.5)
- Shifter (Gen 6/6.5)
- Steering Wheel Controls (Gen 6) / LE's use PLCC-2
- Steering Wheel Controls (Gen 5/5.5)
- Window Switch (Gen 6)
- Underbody Lighting new.gif
__________________________________________________
LED vs Stock bulb numbers
There are bulbs that may have a different numbers but is the same as another bulb that has a different number. Dont know what the real purpose of this is for but here is a list:

- 194 replaces 147 152 158 159 161 168 184 192 193 259 280 285 447 464 555 558 585 655 656 657 1250 1251 1252 2450 2652 2921 2825 (Wedge)
- 921 replaces 906 579 901 904 908 909 912 914 915 916 917 918 920 921 922 923 926 927 928 939 (Wedge)
- 3022 replaces 3021 3175 6428 6430 (Festoon)
- 3157 & 3156 replaces 3057 3155 3357 3457 4157
- 74 replaces T5
__________________________________________________
**NOTE: There is no specific type of LED to buy. So as long its the one of the correct sizes above, you can get ANY LED you want. (VLED V-STAR LEDs that expand may not fit due to size being bigger. It will not lock in socket). All sizes below is the most common sized used on LED sites. LED size below will not be the same as that found on Sylvania. IF NO GEN # IS LISTED, THAT MEANS IT IS FOR GEN 5/5.5/6/6.5.
- Gen 5/5.5 LED Purchase List with Links (purchased by rickdogg)
- Gen 6/6.5 LED Purchase List with Links (purchased by dcemureviews)
- Gen 6/6.5 LED Purchase List (purchased by rapolonio)
Interior (listed in alphabetical order)
- Airbags/Security/Seatbelt (Gen 6) - QTY:4 - PLCC-2 LEDs *Soldering required
- Courtesy Door (Gen 6/6.5) - QTY:2 - 194 wedge bulbs
- Dome (sunroof only) - QTY:1 - 194 wedge bulb
- Dome (no sunroof) - QTY:1 - 3175/3022 festoon bulb (31mm)
- Glove Box - QTY:1 - 74 wedge bulb
- Heated Seats (Gen 5/5.5) - QTY:2 - NeoWedge (NEO3 - 3mm)
- HVAC Controls (Gen 5/5.5) - QTY:9 - Neo Wedge (NEO4 - 4mm - buttons + hazard)
- HVAC Controls (Gen 6) - QTY:6 (2 per ****) - PLCC-2 LEDs *Soldering required
- Map Light - QTY:2 - 194 wedge bulbs
- Rear Reading Lights (Gen 6/6.5 - sunroof only) - QTY:2 - 194 wedge bulbs
- Shifter - QTY:1 - 74 wedge bulb
- Steering Wheel - QTY:3 (no Bluetooth) or QTY:5 (with BT) - 1206 smd (Gen 6); PLCC-2 LEDs (Gen 5.5) *Soldering required
- Stereo Headunit (Gen 6) - QTY:8 - PLCC-2 LEDs *Soldering required
- Trunk - QTY:1 - 194 festoon bulb

- Vanity - QTY:2 - 194 wedge bulbs (Gen 6/6.5) / Vanity (29mm - Gen 5/5.5)
- Window Switch Control (driver side only) - QTY:1 - 1206 LED (Gen 6.5 - Driver door) / 5mm LED lamps (Gen 6) / 3mm (Gen 5/5.5 & Gen 6.5 - Passenger door) *Soldering required
Exterior (listed in alphabetical order)
- Back Up/Reverse Lights - QTY:2 - 921 bulbs (get the brightest or it wont be visible during the day for safety reasons; 27+ LED or High Power)
- Center High Stop Mount (Gen 5/5.5) - QTY:1 - 194 wedge bulb
- Front/Rear Sidemarker - QTY:2 - 194/2825 wedge bulbs (worth changing ONLY if your remove reflector and want white light. Otherwise, you're wasting money)
- Front Turn Signal/Parking Lights** (Gen 5/6) - QTY:2 - 3157/3457 (must be CK type (SWACK or SACK). if using regular LED, read below for more information. get the brightest or it wont be visible during the day for safety reasons; 48+ LED/High Power)
- Front Turn Signal/Parking Lights** (Gen 5.5) - QTY:2 - 7440 (must be CK type (SWACK or SACK). if using regular LED, read below for more information. get the brightest or it wont be visible during the day for safety reasons; 48+ LED/High Power)
- The CK bulb is designed for special applications commonly found on Toyota vehicles like the Camry, RAV4, 03-08 Corolla, and all Tundras. If you have a standard socket and try installing this bulb may cause a dead short and blow your fuse or will not light on the parking element. (info from V-LEDS)
- SWA probably means Switchback White Amber CK
- SA probably means Standard(?) Amber CK
- (from ruc2827) 3457 front parking/turn signal bulbs are SACK wiring (see http://www.autolumination.com/conversion.html), which is a special wiring common on Toyotas, where both the high and low + wires are on one side of the wedge, rather than opposed which is normal. For incandescent bulbs, this doesn't matter since polarity doesn't matter, but for LEDs where most bulbs require a certain polarity this absolutely matters and will cause fuses or bulbs to burn out. V-LEDs.com and Autolumnation.com sell SACK type bulbs, or you can rig one by moving the ground wire on the side of the high + wire to the other side, and move the low + wire to where the ground was by flipping it over and angling it. It is a little precarious and you may need to cut out some of the base to run the low + wire across then tape with electrical tape to avoid touching any contacts. You can figure out which end are the grounds by using a multi meter and test for resistance. The two grounds should have no resistence, making a closed circuit. If you orient the bulb with both grounds down facing you, the high + is the on the upper left and the low + is on the upper right. You need to flip the bottom left ground over and move the upper right + to the lower left where the ground was. Its messy, but it works if you are careful and look at the socket to see where everything needs to go and make sure it fits before firing it up (the socket is removable to see it better by squeezing the base to release it.)
- Low Beam/DRL/High Beam/Fog Lights - **DO NOT** put LEDs into any of these locations. LEDs do not put out enough wattage and are not as bright as halogen bulbs!
- Rear Turn Signal** (Gen 5/5.5) - QTY:2 - 921 bulbs (get the brightest or it wont be visible during the day for safety reasons; 48+ LED or High Power)
- Rear Turn Signal** (Gen 6/6.5) - QTY:2 - 7440 bulbs (get the brightest or it wont be visible during the day for safety reasons; 48+ LED or High Power)
- Tail Lights** (Gen 5/5.5 - for OEM stock housings only) - QTY:2 - 3157 (get the brightest or it wont be visible during the day for safety reasons; 27+ LED or High Power)
- Tail Lights** (Gen 6 only - for OEM stock housings only) - QTY:2 - 7443 wedge bulbs (get the brightest or it wont be visible during the day for safety reasons; 27+ LED or High Power)
** The following are a MUST if you are changing your turn signals or taillights to LED. If an LED is giving you problems, you'll need to get this. Not installing these will blow your relay/fuse, bulb out warning or hyper flashing/blinking. YOU DO NOT NEED BOTH. CHOOSE ONE OF THE TWO.
- LED Flasher Module (CF18 - #81980-50030 - MAX 150W. Original part #81980-02030) - QTY:1 - Located behind instrument panel (Gen 6/6.5). Requires removal of panels around steering wheel and removing original DENSO module (see above for link to DIY or service manual for more info). Module works with normal bulbs as well. No need to cut any factory wires. *You lose parking light flashing confirmation with arming/disarming (lock/unlock) using OEM keyfob. If using aftermarket alarm like Viper, you still have flashing confirmation.
- Load Resistors (3ohm 50W 4 LED) - QTY:2 (install where ever is easiest and away from wires) - You splice/tap into original wires with supplied connectors. If you remove load resistors in the future, you can cover exposed wires with electrical tape. *DO NOT let load resistor touch wires or plastic as it gets hot and will melt them. Its best to get the 3ohm 4 LED as it works for front and rear and you only need 2 resistors. 6ohm 2 LED only works for the LED it is using it. So if you have 6ohm 2 LED resistor installed in rear, only rear will work and you would need another 2 for the front. If you got the 3ohm 4 LED, you only need 2 resistors and no matter where you install, it will work for front and rear. The driver side of car uses same wiring for front and rear. The passenger side of car uses same wiring for front and rear.
I'll be updating this post if I find any useful information. So check back to see what is new.
Last edited by dcemureviews; 05-20-2010 at 01:17 PM. Reason: new/updated DIY links and info
#2
05-23-2009, 11:48 AM
OK, so I finally got to changing my glove box to LED. At first, I tried to remove the bulb by using tweezers/pliers and a mirror to see up into the glove box. But I got no where and gave up. I knew the glove box was removable but didnt know how. So I looked at the service manual again as I'm looking into gaining access to the back of instrument panel. I'll save that for another DIY (maybe). But onto the DIY...
Tools needed for DIY:
__________________________________________________
CLICK ON IMAGES TO ENLARGE
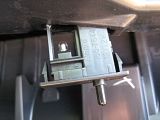
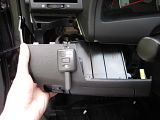
1. There are 3 philips screws. Remove them.
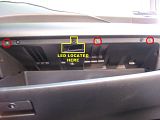
2. This is the bottom left of glove box. Remove philips screw
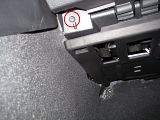
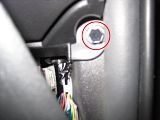
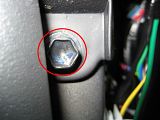
3. This is on the bottom right side behind the cover. You'll need a 10mm ratchet wrench. Try not to drop it...just to save yourself some trouble.
4. Once all screws and bolts are removed, grab the sides, insides or anything and pull towards you. The glove box will fall. It's held in place by 3 yellow clips and 2 black ones.
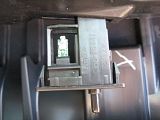
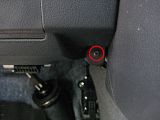
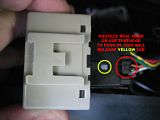
5. On the dash itself, you'll see a little black button. Reach your finger underneath and push it out. You'll be presented with this...
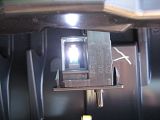
6. Swap the bulb for with the LED.
7. Once swapped, turn the stalk to DRL or headlight to make sure it lights up.
8. Put everything back in reverse order. At the bottom of the glove box, there is a cover. If it falls out of place, just put them back into place. The pegs go into a small opening (sorry no picture. Hard to take a picture). Also, when you're putting the bottom right cover back, make sure you pull towards you a little and place the cover over the white piece and than push in to snap in place.
Tools needed for DIY:
- Fingers/hands
- Philips Screwdriver
- 10mm Ratchet Wrench
__________________________________________________
CLICK ON IMAGES TO ENLARGE
1. There are 3 philips screws. Remove them.

2. This is the bottom left of glove box. Remove philips screw

3. This is on the bottom right side behind the cover. You'll need a 10mm ratchet wrench. Try not to drop it...just to save yourself some trouble.

4. Once all screws and bolts are removed, grab the sides, insides or anything and pull towards you. The glove box will fall. It's held in place by 3 yellow clips and 2 black ones.

5. On the dash itself, you'll see a little black button. Reach your finger underneath and push it out. You'll be presented with this...

6. Swap the bulb for with the LED.

7. Once swapped, turn the stalk to DRL or headlight to make sure it lights up.

8. Put everything back in reverse order. At the bottom of the glove box, there is a cover. If it falls out of place, just put them back into place. The pegs go into a small opening (sorry no picture. Hard to take a picture). Also, when you're putting the bottom right cover back, make sure you pull towards you a little and place the cover over the white piece and than push in to snap in place.

#3
05-23-2009, 11:48 AM
Got my Electronic LED Flasher for my LED turn signals and decided to do a DIY since it seemed fairly easy and I had a half day giving me enough daylight out in case I run into a snag.
*NOTE: You will lose your parking light flash when you arm/disarm (lock/unlock) your car. I also lost my hazards when no key is in the ignition.
Tools needed for DIY:
__________________________________________________
CLICK ON IMAGES TO ENLARGE
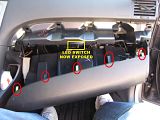
1. Like the DIY for the LED Glove Box, there is a 10mm bolt (left side) and a screw (right side). You'll need to move the cover out of the way to access the bolt. So you'll need a 10mm ratchet wrench and philips screwdriver for the screw.
2. Now that the screw and bolt is removed, pull on the bottom panel until all clips are dislodged. The cable for the hood will prevent you from removing it from the car. You can probably unclip the cable or something but I left it on there.
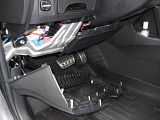
3. Once the bottom panel is off, you can remove the two panels to the side of the steering wheel. Both are held in by clips. There are no screws. Just pull them out and place them out of the way.
4. Now we get to the instrument panel. There are two clips at the top of the panel.
5. Push the middle in with a screwdriver or something thin. Than take a flathead screwdriver or your fingernails and pull it out.
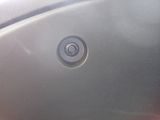
6. Once the pins are removed, you can remove the instrument panel cover. Just pull it out and place it out of the way.
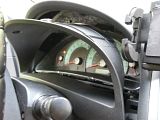
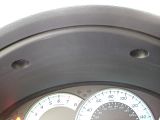
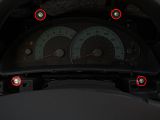
7. The instrument cluster should now be visible. There are four screws; 2 on top and 2 on the bottom. Just use your philips screwdriver and remove them. Try not to drop them. I dont know where they would end up if it drops.
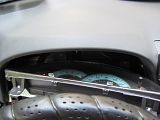
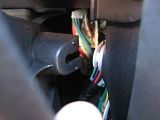
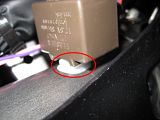
8. There is no need to unplug the instrument cluster. Just move the instrument cluster to the right side (radio) so that its out of the way. This is where it took the longest for me. On the left side, you'll see the DENSO flasher module.
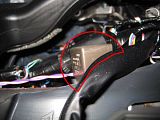
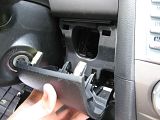
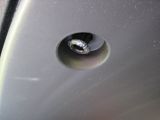
9. First unplug the cable. Either use your fingers to squeeze the tab (you'll have to do it blind and feel for it). I used a flathead to help me as the tab was too small for my fingers and I couldnt get a good grip (module is from electronic LED flasher and for reference on where the tab is located).
10. The flasher module is held in place by a white clip. To remove this, take a flathead screwdriver and get it under the white piece. Pry it up. Once you have the whole thing remove, just stick your flathead screwdriver in between the flasher module and white clip and unlatch it.
11. Once you swapped the flasher module with the electronic LED flasher module, plug the cable into the electronic LED flasher. Before you put everything back, place a LED bulb into one of the rear turn signals (if you havent done so) and make sure everything works by inserting key into ignition and using the turn signal. You dont want to put everything back only to find out something is wrong and you have to take it all apart again. Once you have confirmed that it works, put the flasher back onto the clip. Now that everything is good, put everything back in reverse order.
12. As for the clip from the instrument panel cover, since the center was pushed in for removal, you'll have to push the pin out for when you are inserting it back after everything is done.
End result, fully functional LED turn signals without splicing/tapping into factory wires. Even if you were to change back to regular filament bulbs, the electronic LED flasher will work with it as well. When you unlock/lock your doors with your keyfob, the parking lights will NOT flash for confirmation. However, the flashing confirmation worked with my Viper 5701 alarm. One thing for me that also didnt work is hazard lights with NO key. Hazard lights ONLY work if the key is turned to ON (right before you turn to ignition) or if the car is running. That is the only time the hazard will come on. This could also be due to the fact that I have Viper alarm and this could be causing the problem. Others who dont have an aftermarket alarm system have no problems with hazards with no key.
DRL on with Parking Lights
DRL on with Parking Lights and Turn Signal

Black Housed TSX Retrofitted Headlights on with Parking Lights
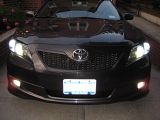
Black Housed TSX Retrofitted Headlights on with Parking Lights and Turn Signal
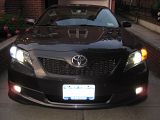
To gain access to the parking light bulbs, you'll have to go through the wheel well. No way to get to them through the engine bay.
LED Turn Signal video - http://www.youtube.com/watch?v=nhETq2VbuX0
*NOTE: You will lose your parking light flash when you arm/disarm (lock/unlock) your car. I also lost my hazards when no key is in the ignition.
Tools needed for DIY:
- Fingers/hands
- Philips Screwdriver
- Flathead Screwdriver
- 10mm Ratchet Wrench
__________________________________________________
CLICK ON IMAGES TO ENLARGE
1. Like the DIY for the LED Glove Box, there is a 10mm bolt (left side) and a screw (right side). You'll need to move the cover out of the way to access the bolt. So you'll need a 10mm ratchet wrench and philips screwdriver for the screw.


2. Now that the screw and bolt is removed, pull on the bottom panel until all clips are dislodged. The cable for the hood will prevent you from removing it from the car. You can probably unclip the cable or something but I left it on there.

3. Once the bottom panel is off, you can remove the two panels to the side of the steering wheel. Both are held in by clips. There are no screws. Just pull them out and place them out of the way.


4. Now we get to the instrument panel. There are two clips at the top of the panel.

5. Push the middle in with a screwdriver or something thin. Than take a flathead screwdriver or your fingernails and pull it out.


6. Once the pins are removed, you can remove the instrument panel cover. Just pull it out and place it out of the way.

7. The instrument cluster should now be visible. There are four screws; 2 on top and 2 on the bottom. Just use your philips screwdriver and remove them. Try not to drop them. I dont know where they would end up if it drops.


8. There is no need to unplug the instrument cluster. Just move the instrument cluster to the right side (radio) so that its out of the way. This is where it took the longest for me. On the left side, you'll see the DENSO flasher module.

9. First unplug the cable. Either use your fingers to squeeze the tab (you'll have to do it blind and feel for it). I used a flathead to help me as the tab was too small for my fingers and I couldnt get a good grip (module is from electronic LED flasher and for reference on where the tab is located).

10. The flasher module is held in place by a white clip. To remove this, take a flathead screwdriver and get it under the white piece. Pry it up. Once you have the whole thing remove, just stick your flathead screwdriver in between the flasher module and white clip and unlatch it.

11. Once you swapped the flasher module with the electronic LED flasher module, plug the cable into the electronic LED flasher. Before you put everything back, place a LED bulb into one of the rear turn signals (if you havent done so) and make sure everything works by inserting key into ignition and using the turn signal. You dont want to put everything back only to find out something is wrong and you have to take it all apart again. Once you have confirmed that it works, put the flasher back onto the clip. Now that everything is good, put everything back in reverse order.
12. As for the clip from the instrument panel cover, since the center was pushed in for removal, you'll have to push the pin out for when you are inserting it back after everything is done.

End result, fully functional LED turn signals without splicing/tapping into factory wires. Even if you were to change back to regular filament bulbs, the electronic LED flasher will work with it as well. When you unlock/lock your doors with your keyfob, the parking lights will NOT flash for confirmation. However, the flashing confirmation worked with my Viper 5701 alarm. One thing for me that also didnt work is hazard lights with NO key. Hazard lights ONLY work if the key is turned to ON (right before you turn to ignition) or if the car is running. That is the only time the hazard will come on. This could also be due to the fact that I have Viper alarm and this could be causing the problem. Others who dont have an aftermarket alarm system have no problems with hazards with no key.
DRL on with Parking Lights

DRL on with Parking Lights and Turn Signal

Black Housed TSX Retrofitted Headlights on with Parking Lights

Black Housed TSX Retrofitted Headlights on with Parking Lights and Turn Signal

To gain access to the parking light bulbs, you'll have to go through the wheel well. No way to get to them through the engine bay.
LED Turn Signal video - http://www.youtube.com/watch?v=nhETq2VbuX0
Last edited by dcemureviews; 06-07-2009 at 08:02 PM.
#4
06-05-2009, 06:13 AM
In the first post, I put a section for DIY Requests. If anyone has done it, please post a tutorial. If you plan on doing it, please post a tutorial as well.
#5
06-19-2009, 12:18 AM

Updated list of LED replacement bulbs for TCH as of 11/26/2011:
- (2) Amber 7W High Power 20 LED 3157 SACK
- Front turn signals
- (2) Amber 2W High Power 4 LED 194
- Side marker lights
- (2) Amber 7W High Power 20 LED 7440
- Rear turn signals
- (2) 5K White 8W 19 LED 921
- Reverse lights
- (6) 5K White 2W High Power 4 LED 194
- Rear reading lights
- Front doors
- Vanity lights
- (2) 5K White X5 2.5W High Power 5 LED 194
- Trunk light
- Front dome light
- (4) 5K White 1W High Power 2 LED 194
- Front reading lights
- License plate lights
- (2) 6K White 3 LED Wedge Base 74
- Glove compartment light
- Gear shifter backlight
- CF18-08 Electronic Flasher - the one that works is from superbrightleds.com. The the hazards do not work with the car off using the one in the DIY above from VLEDS (learned the hard way). You still loose the confirmation flash (you get the beep) when locking your doors, but this is the only way to use LED turn signal bulbs. It works with incandescent bulbs as well.
Last edited by ruc2827; 11-26-2011 at 01:54 AM.
#6
06-19-2009, 04:53 PM
Great list of replacement bulb sizes and DIYs. This should definitely be added to the FAQ, if you are reading this Haroldo.
One major omission is that the 3457 front parking/turn signal bulbs are SACK wiring (see http://www.autolumination.com/conversion.html), which is a special wiring common on Toyotas, where both the high and low + wires are on one side of the wedge, rather than opposed which is normal. For incandescent bulbs, this doesn't matter since polarity doesn't matter, but for LEDs where most bulbs require a certain polarity this absolutely matters and will cause fuses or bulbs to burn out. V-LEDs.com and Autolumnation.com sell SACK type bulbs, or you can rig one by moving the ground wire on the side of the high + wire to the other side, and move the low + wire to where the ground was by flipping it over and angling it. It is a little precarious and you may need to cut out some of the base to run the low + wire across then tape with electrical tape to avoid touching any contacts. You can figure out which end are the grounds by using a multi meter and test for resistance. The two grounds should have no resistence, making a closed circuit. If you orient the bulb with both grounds down facing you, the high + is the on the upper left and the low + is on the upper right. You need to flip the bottom left ground over and move the upper right + to the lower left where the ground was. Its messy, but it works if you are careful and look at the socket to see where everything needs to go and make sure it fits before firing it up (the socket is removable to see it better by squeezing the base to release it).
I just finished swapping out ALL my bulbs for LEDs, mostly for a cooler white look and brightness. Since you didn't specify bulb type (flank, etc) and wattage, I'm going to provide my list and recommendations:
- 2 3157 7W High Power LED bulbs for front turn signals. These are the brightest 3157 LED bulbs made, and are actually brighter than the original (although technically less lumens since the LED light is directional so is brighter directly behind the vehicle whereas the incandescent bulb shines in all directions so produces more light overall, but isn't as bright in any one direction if that makes sense). Note, these are NOT SACK type which are required (see above), so you'll have to rig these.
- 2 7440 7W High Power LED bulbs for rear turn signals. These are the brightest 7440 LED bulbs made, and are also brighter than the original (see above).
- 4W High Power LED 194 bulbs - These are incredibly bright, equivalent to a 20W incandecent bulb, and you have LEDs on both sides and the end, so perfect for sockets with reflectors, which all the ones below have, since you need side light to reflect as well as directional light.
- 1 in trunk - This made a huge difference and I wouldn't go any lower since the existing bulb is anemic
- 2 in rear reading lights - These sockets are recessed and hide most of the light, so I would recommend no less than these 4W bulbs to provide a lot of light
- 2 in front reading lights - These you could opt for the X5 2.5W High Power LED bulb, which is about half as bright. It really depends if you want it brighter than the standard bulbs or about the same. Consider if you will use these while driving as well, since 4W might be blinding.
- 1 in front dome light - could replace with 2.5W and be fine, but you might want to use 4W since they come in pairs and you need one for the trunk and this one comes on by itself unlike the reading lights, and aren't used while driving
- 2W high power LED flank bulb - these are for where you don't have reflectors, so just need one-directional light
- 2 in front doors - These are extremly bright, which is good for safety and visibility when opening your doors. You could get away with the 1W high power LED flank bulb if you prefer less light
- 2 for vanity lights in shades - could definitely use 1W if you prefer less light, but 2W allows you to put on makeup in pitch black, so your call
- 2 for side markers - I played around with a lot of bulbs on these. There really is no reflector, so flanks make sense, however flanks only come in white, not amber. I tried a 2W high power amber non-flank, and it was no brigher than the original. I also tried the 2.5W X5, and it was no brighter. I ended up with the 2W flank which is much brighter from the side for safety, although looks a little yellow since it is a white bulb (not avialable in amber)
- 2 1W 5K high power flank bulb for license plate. I actually used the 5K non-flank bulb, however the angle of the bulb is such that a flank would face directly towards the license plate, and you really don't need any side lights and there is no reflector, so back light is pointless. So in retrospect I would go with the flank. I chose 5K color instead of 6K (which is what everything else is) since these are external and 5K more closely matches the non-xenon lights and is less distractive to drivers IMO. You could use the standard low-power LED flank which is $1 more, but lower power and 6K.
- 3 SMT LED 74 base bulb
- 1 for glove compartment - originally used the single high power .5W LED, but this didn't have any side-light pointing down, so was actually less light than the original. This bulb is lower power, but more light downward which is what you need.
- 1 for gear shifter backlight - any 74 base bulb will work for this. Note I used white, although the original is white with a cyan rubber cap. I prefer the pure white to the nasty cyan (if only you could change out the cyan on the middle console). you could go with blue or green LED if you want a closer match to the original
- Electronic Flasher - this is the one in the DIY above. You loose the confirmation beep but the flashers wont' work without it.
- Note I didn't buy reverse lights since these are rarewly used while driving and didn't provide as much lumens even with high-power LEDs. If they come out with a 7W high power bulb it would be brigher, but still probably not worth it when they are $50. The $50 for parking lights on the other hand reduce the running wattage at night and increase and brightness for safety, as do the rear (although these don't save power since they are only on to turn unlike the front).
- Front Turn Signal/Parking Lights** - QTY:2 - 3157/3457 (SWACK/SACK if purchasing from V-LEDs. get the brightest or it wont be visible during the day for safety reasons; 48+ LED/High Power)
I should update it stating that its also available from Autolumination.
#7
06-19-2009, 04:56 PM
These are the bulbs that I ordered for those curious
 - (1) Dome (sunroof only), (2) Visor Vanity, (2) License Plate, (2) Rear Reading - #194 bulbs
 - (2) Front Map Lights - #194 bulbs
 - (2) Courtesy Door - #194 bulbs
 - (1) Shifter - #74 bulb
 - (1) Glove Box - #74 bulb
 - (2) 27-LED Reverse Light (link is to 36 since the 27 is no longer being sold)
 - (2) 7W 20 High Power LED Rear Turn Signal (requires LED flasher module or load resistors)
 - (2) Type 2 SWACK 60-LED Front Turn Signal (requires LED flasher module or load resistors)
 - Cathode Trunk Light Kit
- (1) Dome (sunroof only), (2) Visor Vanity, (2) License Plate, (2) Rear Reading - #194 bulbs - (2) Front Map Lights - #194 bulbs - (2) Courtesy Door - #194 bulbs - (1) Shifter - #74 bulb - (1) Glove Box - #74 bulb - (2) 27-LED Reverse Light (link is to 36 since the 27 is no longer being sold) - (2) 7W 20 High Power LED Rear Turn Signal (requires LED flasher module or load resistors) - (2) Type 2 SWACK 60-LED Front Turn Signal (requires LED flasher module or load resistors) - Cathode Trunk Light Kit
#8
06-20-2009, 04:22 PM
Noticed you had TSX retrofit Xenon headlights. Any DIY for those? I don't really want to run new electrical wiring, so went for the brightest halogens on the market (H11 OSRAM Night Breaker, avail for $40 from UK with free shipping, http://www.bing.com/search?q=H11+OSR...aker&form=QBRE).
#9
06-22-2009, 08:28 AM
Noticed you had TSX retrofit Xenon headlights. Any DIY for those? I don't really want to run new electrical wiring, so went for the brightest halogens on the market (H11 OSRAM Night Breaker, avail for $40 from UK with free shipping, http://www.bing.com/search?q=H11+OSR...aker&form=QBRE).
If you feel you can do it yourself, check www.hidplanet.com. You can get bulbs, ballast, HID lenses and other things from either the site who sells parts or from other users.
Last edited by dcemureviews; 06-22-2009 at 08:34 AM.

Thread
Topic Starter
Forum
Replies
Last Post
navguy12
HCH II-Specific Discussions
5
01-22-2010 11:38 AM
bluecivichybrid
HCH I-Specific Discussions
0
08-26-2007 12:21 AM
Eskrimast1
Honda Civic Hybrid
28
08-20-2005 12:37 PM


