2003 HCH-1 front brake rotor and pad replacement
#1
 01-11-2012, 07:41 PM


Hi all,
Just wanted to post the details of the DIY front brake job.
So the other day I was leaving a parking lot and as I was slowly rolling along I heard a grinding noise coming from my left front tire. It wasn't constant, but it definitely coincided with the rotation of the wheel. The faster I went the faster the scrape sound. The car is at 190,521 miles and these are the original brakes, so I decided it was time to have a look.
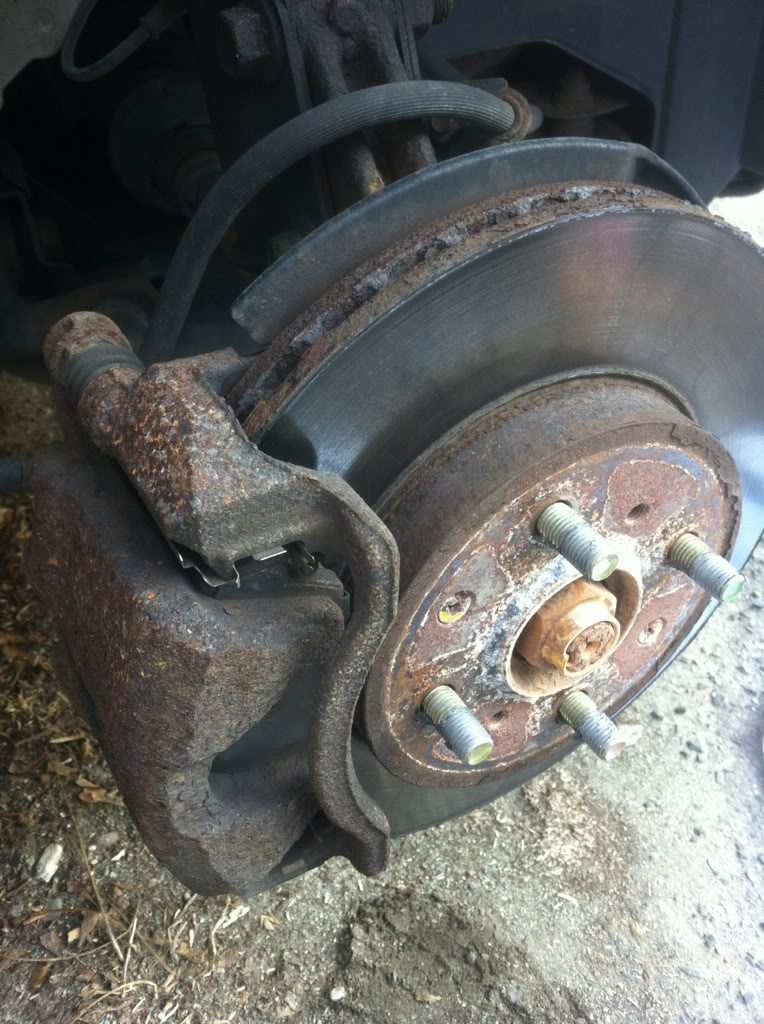
This is what I was up against. Original brakes on a New England car with nearly 200,000 miles on them. You can hardly tell where one part ends and the next begins due to corrosion.

So I decided to do some research. It turns out that the dealer wanted over $500.00 to do the job with parts and labor. No thanks, not interested. I started scouring around online on Autozone.com, Advance.com and Napaonline.com. I found the best deal at Autozone. I was able to order online, and then pick up in-store the pads and rotors. The rotors were approximately 24.99 each (link here) and the pads were $45.99 for a complete set of four pads (2 per wheel) (link here).
I didn't splurge on the parts but I also didn't buy the cheapest **** out there. I didn't care so much about the rotors because...really, how much longer will the car last? However I knew I wanted ceramic pads because they give off less dust, so it keeps your wheels looking good longer and they're easier to clean. After taxes the pads and rotors were $103.65. I also purchased a small pouch of brake lubricant at the register for $1.29, a can of brake cleaner for $3.99 and a disc brake pad spreader for $8.99. You can use a C-clamp instead of the brake pad spreader, but I didn't own a C-clamp and the one for sale at Autozone was...you guessed it: $8.99. I just opted for the brake pad spreader.
At this point I will add that before you try this job yourself, you MUST...MUST have an impact driver to complete this. There are two screws that hold the rotor on to the hub and the only way you're getting them out is with an impact driver. If you try to get them out with a regular screwdriver you will strip them, I promise. I stopped at Sears and bought an impact driver and a rubber mallet for $31.85 after taxes.
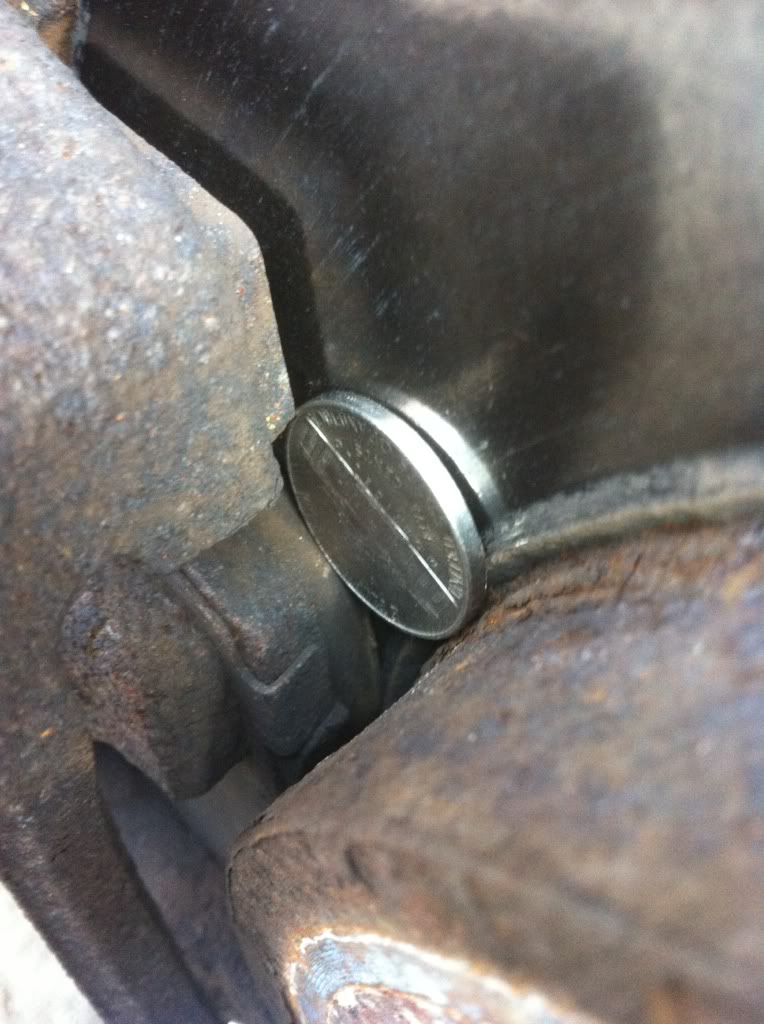
Once I removed the wheel, I was amazed to see how much life the pads had left in them. I would say they were only about 50-60% worn. I got a pic and put a nickel in there to show how much life was left. Amazing to think these are the original brakes. It turned out that the problem was with the left rotor...it was heavily grooved and it's time had expired.
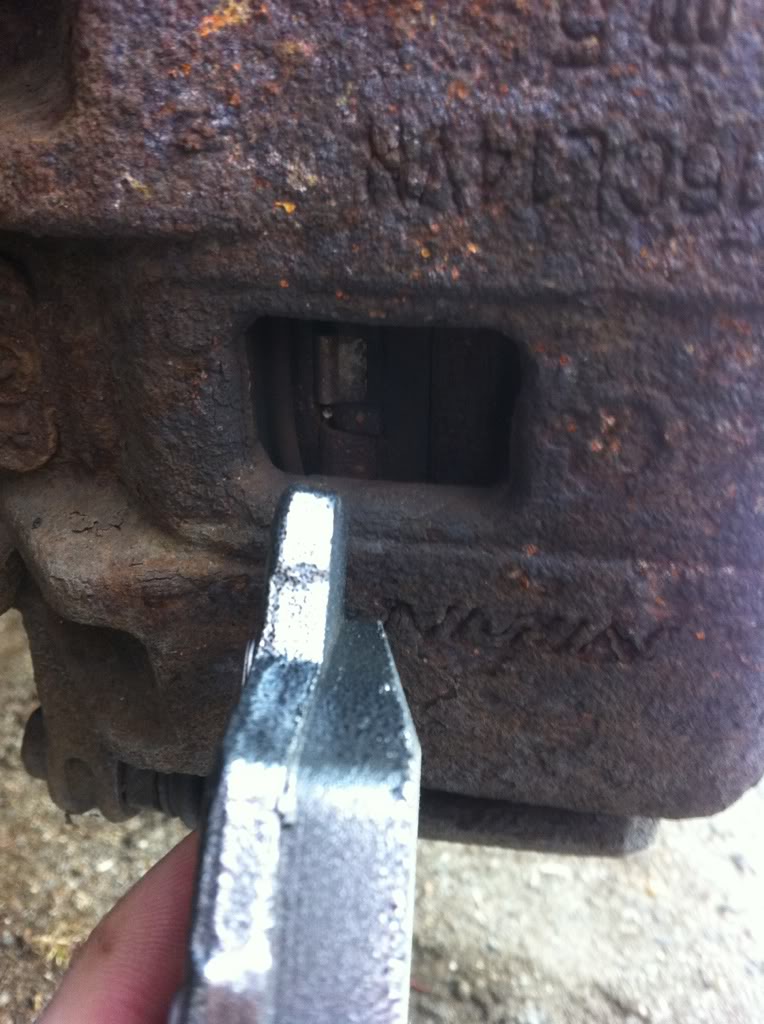
Looking in through the back, you can kind of see the old pad and I'm holding up the replacement for comparison.
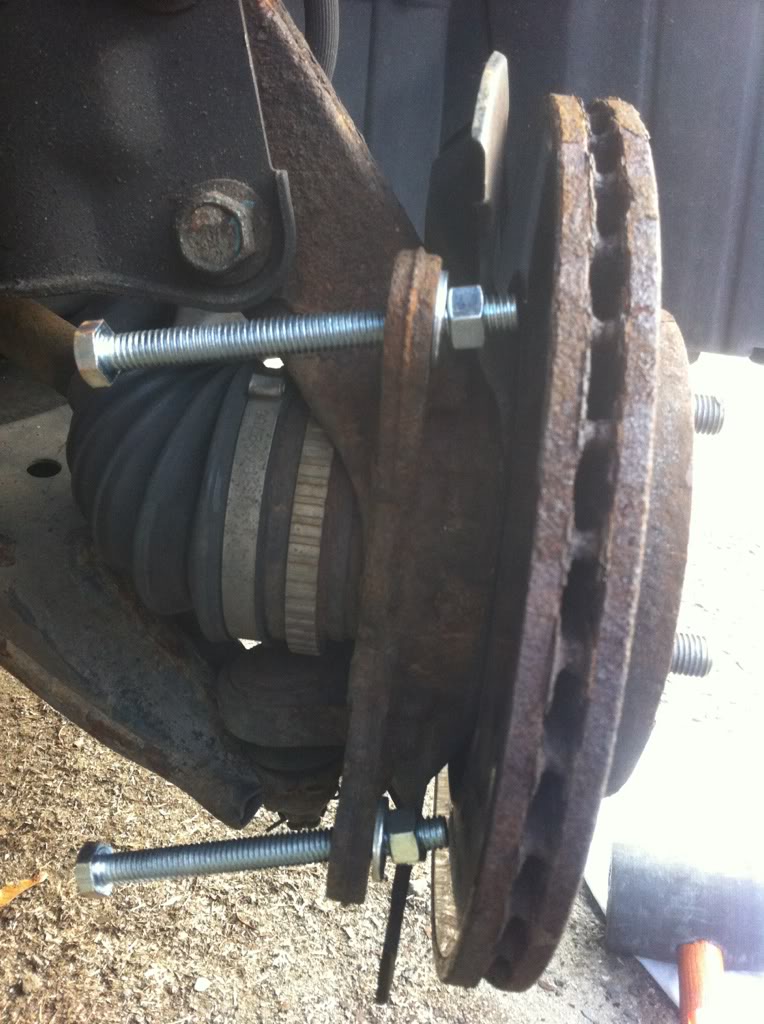
OK, so now began the process of removing all the old parts. I won't get into it here because there are about a hundred YouTube videos dedicated to replacing Honda Civic brakes, but what I will point out is this: after 190,000 miles, those rotors were FROZEN on. They weren't coming off. I beat them senseless with the rubber mallet and they weren't budging. Here is what I did to get them to break free: get two 4" x 3/8" bolts with a washer and a nut for each one. Thread them in like you see in the picture.
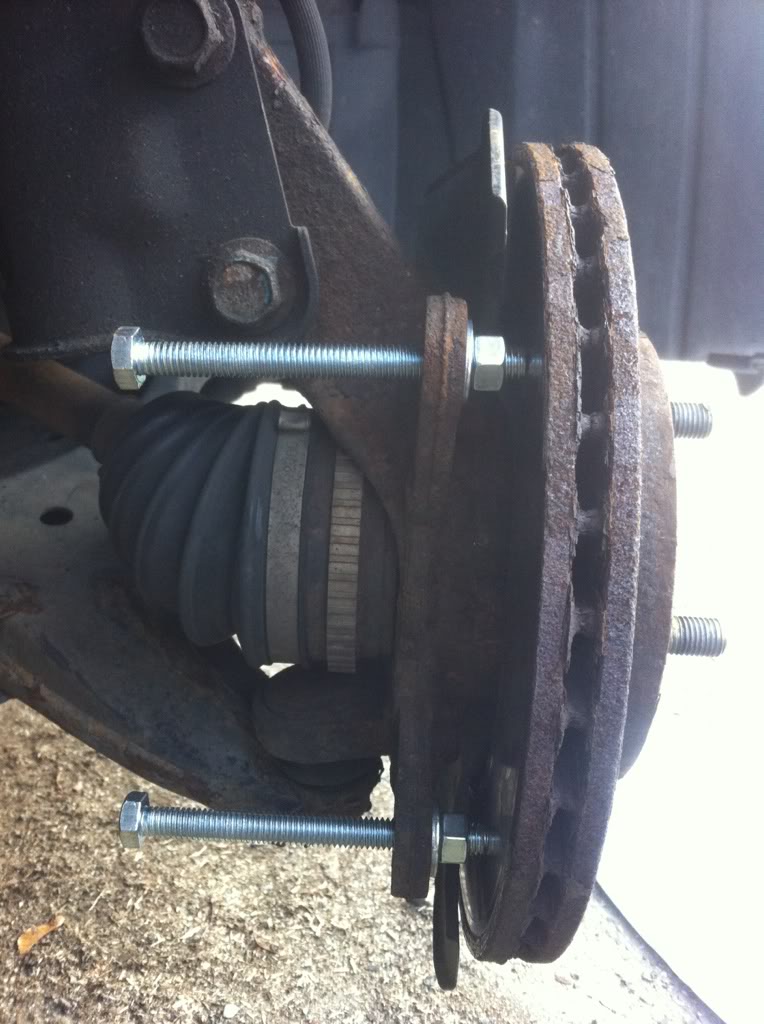
Get them set up so that the bolt end is touching the rotor. Disclaimer: this procedure will **** your rotors up, so don't even try to recycle them or use them again. Just get new rotors.
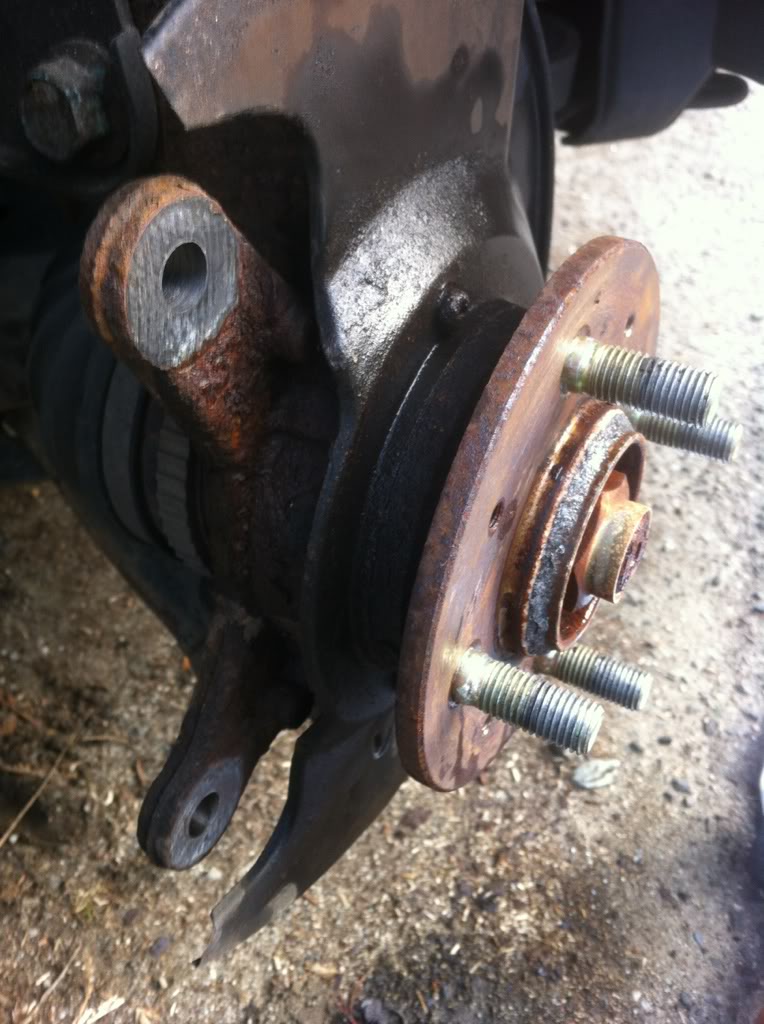
Moving on...using an open-end wrench, hold the nut still and start tightening each bolt 1/4 of a turn at a time and alternate...top-bottom-top-bottom...until you hear a crack sound and you see rust-dust fly. Once you get that broken free, you can remove the rotor by hand or hammer it off with the mallet. One of my rotors came off in 3 turns on each bolt, but the other took my nearly two hours of tightening the bolt, spin the rotor halfway...tighten the bolts, spin the rotor halfway...until I finally got it worked off. Once it breaks free, the bolts go limp like in this picture:
Once the rotor comes off, this is what you've got: (it's still wet with brake cleaner. That all dried up in about 20 seconds)
I put the rotors side by side for a comparison:
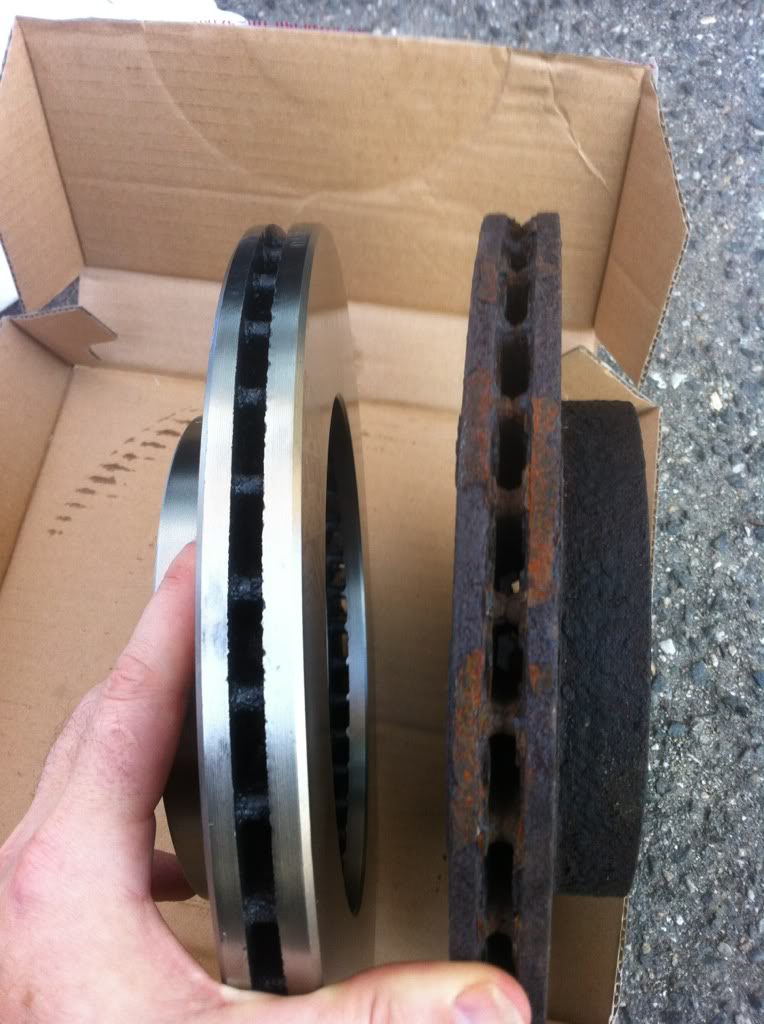
and...

Big difference.
Of course, like every good shadetree mechanic, the job took longer than I planned and I found myself doing a lot of the finish work in the dark.
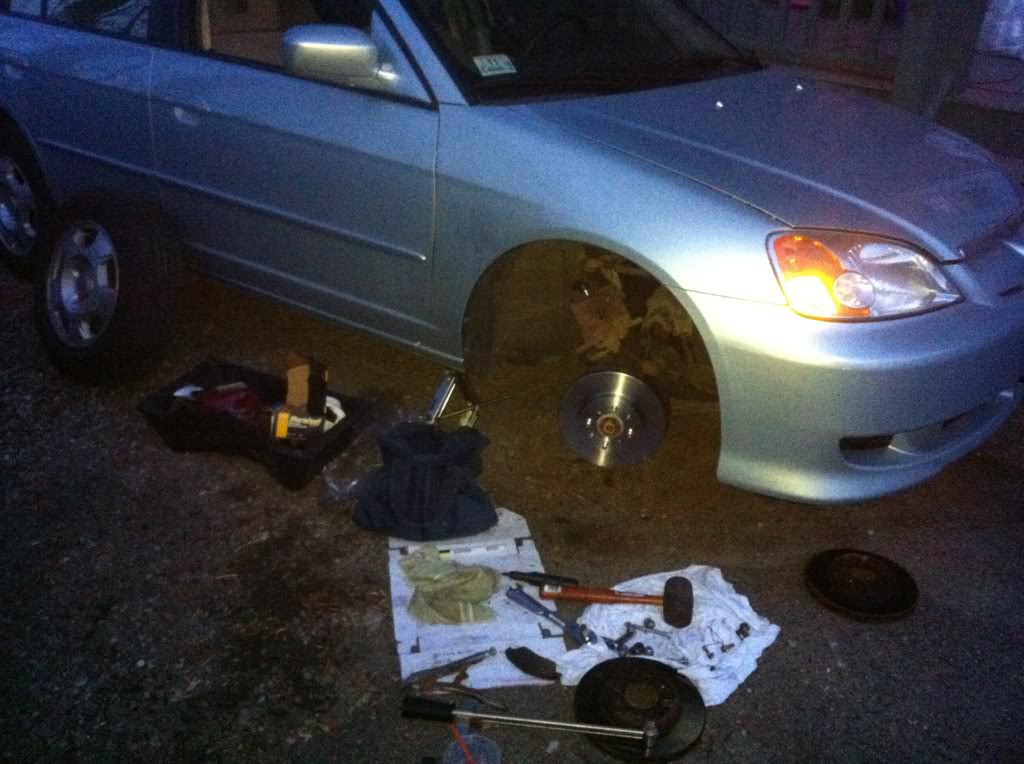
Here is the new rotor installed. Use a cut-up wire coat hanger to hold the caliper/piston assembly up and out of the way. You don't want that dangling by the brake line hose.
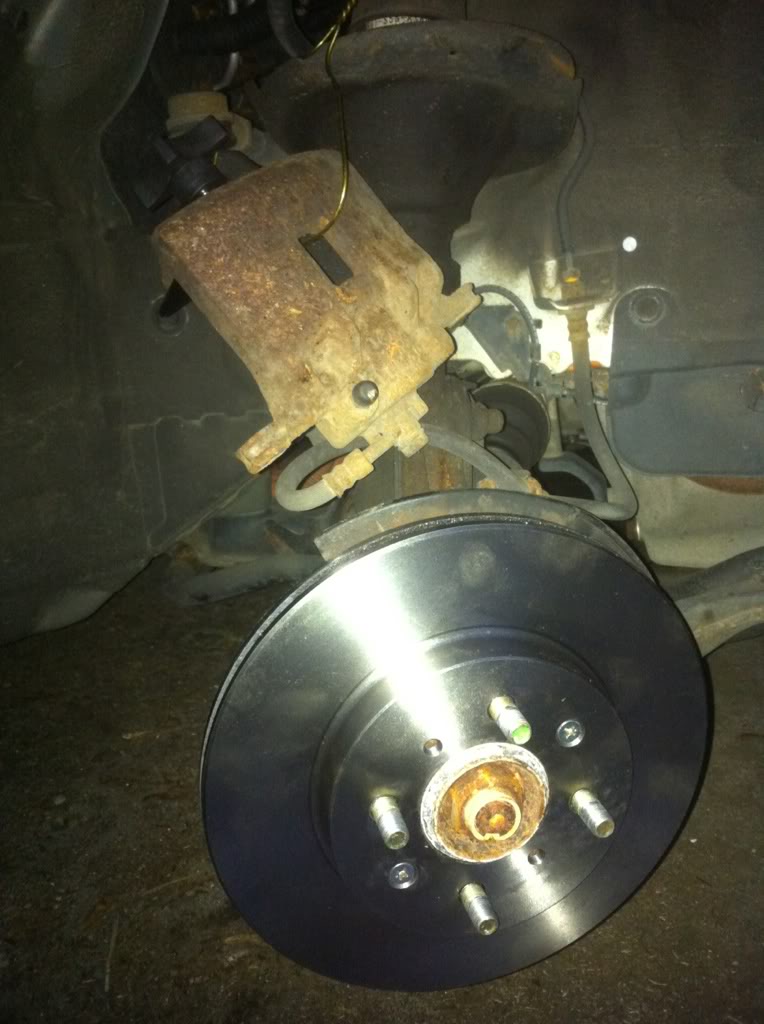
You'll also notice those screws are new. I took a spin over to my local Honda dealership and bought new rotor screws. I'm serious guys, that impact driver is pretty devastating and those screws are designed for "once-in, once out". You'll want to work with new ones. Grand total for screws: $4.32
So, here is the final damage:
Rotors and Pads: $103.65
Brake Lubricant: $1.29
Brake Cleaner: $3.99
Brake Spreader: $8.99
4 Rotor Screws: $4.32
Impact Driver and Rubber Mallet: $31.85
Grand total: $154.09
No more grinding sound, no surprises and there's no way I'll ever have to touch those brakes again for the remaining life of the car.
When I inspected the rear brakes, they still look brand new so I'm not even going to bother changing those out. Once the new rotors are installed, make sure you douse them good in brake cleaner: they come covered with a grease to protect them from corrosion and you'll want ALL of that gone from the braking surfaces before you install the new pads.
Oh, one other thing: I noticed in some of the YouTube videos that the authors remove the brake fluid reservoir cap before they use the Brake Pad Spreader or a C-clamp to push the brake piston back into the caliper. I call shenanigans. Don't do it. Leave the cap on and just turn the clamp or the spreader slowly and you'll find the piston moves right back into the caliper without problems.
Don't be intimidated by a brake job on these cars, they're really basic and will save you a boatload of cash in dealer-labor. Take your time, use the right tool for the job and have fun with it. Enjoy! Hope this helped!
Just wanted to post the details of the DIY front brake job.
So the other day I was leaving a parking lot and as I was slowly rolling along I heard a grinding noise coming from my left front tire. It wasn't constant, but it definitely coincided with the rotation of the wheel. The faster I went the faster the scrape sound. The car is at 190,521 miles and these are the original brakes, so I decided it was time to have a look.
This is what I was up against. Original brakes on a New England car with nearly 200,000 miles on them. You can hardly tell where one part ends and the next begins due to corrosion.
So I decided to do some research. It turns out that the dealer wanted over $500.00 to do the job with parts and labor. No thanks, not interested. I started scouring around online on Autozone.com, Advance.com and Napaonline.com. I found the best deal at Autozone. I was able to order online, and then pick up in-store the pads and rotors. The rotors were approximately 24.99 each (link here) and the pads were $45.99 for a complete set of four pads (2 per wheel) (link here).
I didn't splurge on the parts but I also didn't buy the cheapest **** out there. I didn't care so much about the rotors because...really, how much longer will the car last? However I knew I wanted ceramic pads because they give off less dust, so it keeps your wheels looking good longer and they're easier to clean. After taxes the pads and rotors were $103.65. I also purchased a small pouch of brake lubricant at the register for $1.29, a can of brake cleaner for $3.99 and a disc brake pad spreader for $8.99. You can use a C-clamp instead of the brake pad spreader, but I didn't own a C-clamp and the one for sale at Autozone was...you guessed it: $8.99. I just opted for the brake pad spreader.
At this point I will add that before you try this job yourself, you MUST...MUST have an impact driver to complete this. There are two screws that hold the rotor on to the hub and the only way you're getting them out is with an impact driver. If you try to get them out with a regular screwdriver you will strip them, I promise. I stopped at Sears and bought an impact driver and a rubber mallet for $31.85 after taxes.
Once I removed the wheel, I was amazed to see how much life the pads had left in them. I would say they were only about 50-60% worn. I got a pic and put a nickel in there to show how much life was left. Amazing to think these are the original brakes. It turned out that the problem was with the left rotor...it was heavily grooved and it's time had expired.
Looking in through the back, you can kind of see the old pad and I'm holding up the replacement for comparison.
OK, so now began the process of removing all the old parts. I won't get into it here because there are about a hundred YouTube videos dedicated to replacing Honda Civic brakes, but what I will point out is this: after 190,000 miles, those rotors were FROZEN on. They weren't coming off. I beat them senseless with the rubber mallet and they weren't budging. Here is what I did to get them to break free: get two 4" x 3/8" bolts with a washer and a nut for each one. Thread them in like you see in the picture.
Get them set up so that the bolt end is touching the rotor. Disclaimer: this procedure will **** your rotors up, so don't even try to recycle them or use them again. Just get new rotors.
Moving on...using an open-end wrench, hold the nut still and start tightening each bolt 1/4 of a turn at a time and alternate...top-bottom-top-bottom...until you hear a crack sound and you see rust-dust fly. Once you get that broken free, you can remove the rotor by hand or hammer it off with the mallet. One of my rotors came off in 3 turns on each bolt, but the other took my nearly two hours of tightening the bolt, spin the rotor halfway...tighten the bolts, spin the rotor halfway...until I finally got it worked off. Once it breaks free, the bolts go limp like in this picture:
Once the rotor comes off, this is what you've got: (it's still wet with brake cleaner. That all dried up in about 20 seconds)
I put the rotors side by side for a comparison:
and...
Big difference.
Of course, like every good shadetree mechanic, the job took longer than I planned and I found myself doing a lot of the finish work in the dark.
Here is the new rotor installed. Use a cut-up wire coat hanger to hold the caliper/piston assembly up and out of the way. You don't want that dangling by the brake line hose.
You'll also notice those screws are new. I took a spin over to my local Honda dealership and bought new rotor screws. I'm serious guys, that impact driver is pretty devastating and those screws are designed for "once-in, once out". You'll want to work with new ones. Grand total for screws: $4.32
So, here is the final damage:
Rotors and Pads: $103.65
Brake Lubricant: $1.29
Brake Cleaner: $3.99
Brake Spreader: $8.99
4 Rotor Screws: $4.32
Impact Driver and Rubber Mallet: $31.85
Grand total: $154.09
No more grinding sound, no surprises and there's no way I'll ever have to touch those brakes again for the remaining life of the car.
When I inspected the rear brakes, they still look brand new so I'm not even going to bother changing those out. Once the new rotors are installed, make sure you douse them good in brake cleaner: they come covered with a grease to protect them from corrosion and you'll want ALL of that gone from the braking surfaces before you install the new pads.
Oh, one other thing: I noticed in some of the YouTube videos that the authors remove the brake fluid reservoir cap before they use the Brake Pad Spreader or a C-clamp to push the brake piston back into the caliper. I call shenanigans. Don't do it. Leave the cap on and just turn the clamp or the spreader slowly and you'll find the piston moves right back into the caliper without problems.
Don't be intimidated by a brake job on these cars, they're really basic and will save you a boatload of cash in dealer-labor. Take your time, use the right tool for the job and have fun with it. Enjoy! Hope this helped!

Thread
Topic Starter
Forum
Replies
Last Post


