Today's Mod
#1
 12-29-2006, 09:13 PM

Join Date: Aug 2006
Location: San Francisco Bay Area
Posts: 652
Well, I must say that this little Civic is quite a lot of fun to add mods to. The fact that almost everything snaps together, makes it real easy to work on.
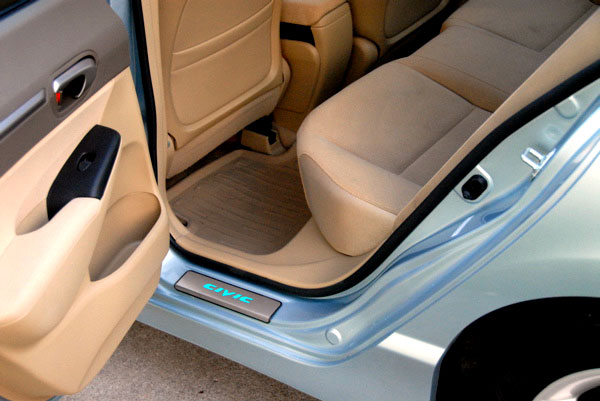
One thing that I noticed is that the Civic does not have any door sill protection. It has only taken less than 2 months for our dogs to put some nice deep scratches in the door sill paint.
This is the first car I have owned in quite a while that did not have any sill plates to protect against scuffing, scratching, etc.
I started to look around for a solution, and while hunting around on eBay, I found a fellow in Hong Kong that was offering some nice scuff plates for the Civic. They are polished stainless steel, and as an added bonus, have an electro-luminescent panel on them that spells "Civic". They are polished stainless steel, and as an added bonus, have an electro-luminescent panel on them that spells "Civic". The kicker was they were only $55 shipped to the US for 4 pieces. So I ordered them on the 18th of December, and they showed up on the 27th.
The electro-luminescent panel requires a 12v supply, so I found a live unused fuse position on the fuse block (#5) to run power to each door sill. I am using a 7 amp fuse for all 4 sills. The ground line goes to the courtesy light switch in each door. This way the sills are only illuminated when that particular door is open.
Some folks may think that these sill plates look a little kitschy, but they are dead ringers for the sill plates on today's Lexus and Porsche.
You be the judge:

By the way, the place I bought them from also offers The plates without the electro-luminescent panels for $40
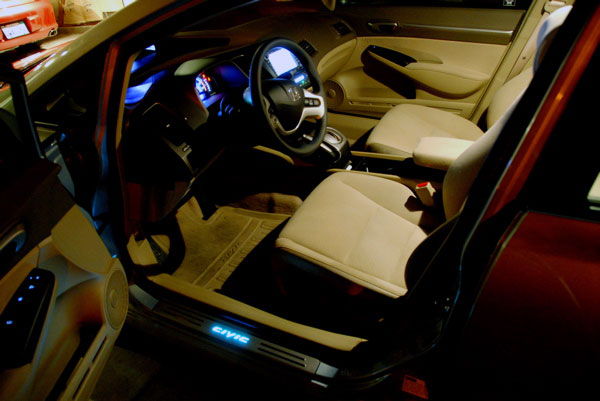
And of course the obligatory Hybrid beauty shot

One thing that I noticed is that the Civic does not have any door sill protection. It has only taken less than 2 months for our dogs to put some nice deep scratches in the door sill paint.
This is the first car I have owned in quite a while that did not have any sill plates to protect against scuffing, scratching, etc.
I started to look around for a solution, and while hunting around on eBay, I found a fellow in Hong Kong that was offering some nice scuff plates for the Civic. They are polished stainless steel, and as an added bonus, have an electro-luminescent panel on them that spells "Civic". They are polished stainless steel, and as an added bonus, have an electro-luminescent panel on them that spells "Civic". The kicker was they were only $55 shipped to the US for 4 pieces. So I ordered them on the 18th of December, and they showed up on the 27th.
The electro-luminescent panel requires a 12v supply, so I found a live unused fuse position on the fuse block (#5) to run power to each door sill. I am using a 7 amp fuse for all 4 sills. The ground line goes to the courtesy light switch in each door. This way the sills are only illuminated when that particular door is open.
Some folks may think that these sill plates look a little kitschy, but they are dead ringers for the sill plates on today's Lexus and Porsche.
You be the judge:
By the way, the place I bought them from also offers The plates without the electro-luminescent panels for $40
And of course the obligatory Hybrid beauty shot

#3
12-29-2006, 10:38 PM
Gary, that is an awesome idea. I've actually wondered about protecting the door sills so much so that I've applied a couple of coats of clear coat spray.
But these sill plates are sharp. I like them especially the luminescence ... it would be even better if it spelled Hybrid or some other custom words- but hey I'd get them like this.
Good stuff.
Cheers;
MSantos
But these sill plates are sharp. I like them especially the luminescence ... it would be even better if it spelled Hybrid or some other custom words- but hey I'd get them like this.
Good stuff.
Cheers;
MSantos


#6
12-30-2006, 08:47 AM
Join Date: Aug 2006
Location: San Francisco Bay Area
Posts: 652
Clicking on the highlighted text on the original post.
To run the wiring, I had to drill a hole on the sill and then fish the wire through that hole and into one of several holes in the interior side of the sill bulkhead. The sill is a double bulkhead, so you drill through 2 levels of metal. After I had run the wire, I filled the hole with a synthetic rubber sealer that is used to waterproof automotive bulkhead seals.
The sill plates themselves have several pieces of double-sided 3M automotive trim mounting tape on them, so they stick quite nice. The key is to clean the sill surface with something like 3M General Purpose Adhesive Remover so that oils, etc. are removed, and the tape sticks to the surface, not the surface contamination.
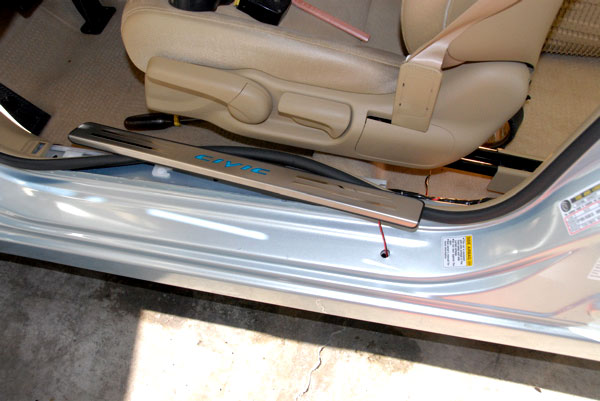

The wiring is run along the main wiring harness on the interior sill. Each Scuff plate has a little transformer for each electro-luminescent panel. I wrapped each one in foam sheet to keep them from rattling, and attached them to the sill with trim mounting tape. Notice the dome light switch connector on the side of the B pillar. That will be the ground line for the sill lights as well as the dome light.

While installing the lighted sill plates was not hard, it is also not for the faint of heart. The drilling and fishing of the wires is tedious, and there is always a bit of trepidation taking a big drill to your car, especially if you are making up the installation as you go!
For the more conservative, I would recommend the non-lighted sill plates.
And yes, there is a bit of Rice in this Mod, but it is allowed. After all isn't a Honda the ultimate Ricemobile?
To run the wiring, I had to drill a hole on the sill and then fish the wire through that hole and into one of several holes in the interior side of the sill bulkhead. The sill is a double bulkhead, so you drill through 2 levels of metal. After I had run the wire, I filled the hole with a synthetic rubber sealer that is used to waterproof automotive bulkhead seals.
The sill plates themselves have several pieces of double-sided 3M automotive trim mounting tape on them, so they stick quite nice. The key is to clean the sill surface with something like 3M General Purpose Adhesive Remover so that oils, etc. are removed, and the tape sticks to the surface, not the surface contamination.
The wiring is run along the main wiring harness on the interior sill. Each Scuff plate has a little transformer for each electro-luminescent panel. I wrapped each one in foam sheet to keep them from rattling, and attached them to the sill with trim mounting tape. Notice the dome light switch connector on the side of the B pillar. That will be the ground line for the sill lights as well as the dome light.
While installing the lighted sill plates was not hard, it is also not for the faint of heart. The drilling and fishing of the wires is tedious, and there is always a bit of trepidation taking a big drill to your car, especially if you are making up the installation as you go!
For the more conservative, I would recommend the non-lighted sill plates.
And yes, there is a bit of Rice in this Mod, but it is allowed. After all isn't a Honda the ultimate Ricemobile?
#7
12-30-2006, 11:06 AM
Dear Uberlord!
Thanks for that, have been looking for scuff protectors for a long while. Have ordered a set - without lights - too difficult for me to instal. Your experience has validated the supplier for the rest of us.
Thanks for that, have been looking for scuff protectors for a long while. Have ordered a set - without lights - too difficult for me to instal. Your experience has validated the supplier for the rest of us.
#8
12-30-2006, 08:42 PM
Now - those aren't TOOLS in your front seat - are they? 
Excellent pictures, again! You 'da man.
Did you find the plastic trim pieces difficult or tricky in any way?
Also the rear-door dome-light switch connecters appear a little tricky to get to (the rear-seat bottom is kind of in the way). Did this pose an issue for you? Or did you just ground the front and rear lighted sillplates to the front-door switches (meaning the font & rear sillplates for a given side light up when opening that side's FRONT door)?
#9
12-31-2006, 02:06 AM
Ridiculously Active Enthusiast
Join Date: Mar 2006
Location: Anaheim Hills, CA
Posts: 655
Gary,
Looks great and I'm really tempted to do this!
My boss had a stroke early this year which paralyzed his left side. He's since returned to work, but cannot drive... so I often pick him up. Unfortunately, when he gets into the car, his left leg brace often scrapes against the sill plate. I now have a few nasty scratches in there. I applied some clear 3M tape (special, thick stuff they use on helicopter blades!) to cover the area and prevent additional damage.
I think the plates you installed would cover the present damage, but how sturdy are they? Will they dent and scratch easily? Is it "Lexus" or "Porsche" quality... or typical Hong Kong quality? If it's real "tinny" I'm only going to buy myself another problem... and with a hole drilled in for wiring, there's no way I can just remove them. I'd have to buy a replacement and I have no clue how long these will be available.
Lastly, any problems with clearance (closed door-to-sill plate)? How much of a gap is there with the plates installed?
Thanks!
#10
12-31-2006, 09:01 AM
Join Date: Aug 2006
Location: San Francisco Bay Area
Posts: 652
To answer the questions:
Yes, there are tools on the seat, but the seat covers have a good coat of Scotchguard on them.... Plus my tools are clean!
About the rear door dome light switch. The pigtail for the rear door switch connector is rather short and can be difficult to work on. What I did was to remove the rear seat cushion, and loosen the upper seat cushion so it could be pushed up a little bit out of the way. The main wiring bundle is held to the body with a plastic push fastener where the switch pigtail is, so I popped it off to give me the ability to pull out the wiring bundle enough to work on it. After I was done, everything went back to where it belongs.
Each door sill lamp has a connection to its respective courtesy light switch. Once you take out the rear seat cushion it is pretty easy. The front of the seat cushion is held in with clips, but the rear has one 10mm bolt that is accessed by where the right and center seat belt buckles are.
The plastic sill plates are very easy to pull out. on the drivers side, there is one screw holding it in that is next to the trunk/fuel filter lock under a trim piece.
The quality of these sill plates is pretty good, they look just like the Lexus piece. Their tolerances are very good, and fit very tightly against the sill with no interference or gap issues.
If you are concerned about the sill plates getting too scratched, then you might want to consider covering them with the 3M clear urethane film as well. Applying the film and using a heat gun to let the film lay into the features of the sill would solve the durability issue.
The trim tape that holds these plates to the sill is very strong and once they are on, they probably aren't coming off, and even if they did, then just plugging the hole with a plastic trim fastener painted to the body color will solve the problem. Another solution to drilling a hole is to get the non-lighted strips.
If you are looking for a sill protector that is more utilitarian, there are some others on eBay that look like just strips of stainless steel.
Over all, I am pleased with this type of sill protection.


